framework/spring mvc 웹사이트제작법
[springMVC웹] 10. 모듈 테스트하는 법 (@RunWith, @ContextConfiguration, @WebAppConfiguration, @FixMethodOrder)
jeri
2024. 8. 5. 16:01
반응형
01. 테이블, DTO
🖤STUDENT테이블
desc student;🖤DTO - Student
package xyz.itwill10.dto;

import lombok.Data;

@Data
public class Student {
	private int no;
	private String name;
	private String phone;
	private String address;
	private String birthday;
}
02. Mapper바인딩
💛[Mapper] StudentMapper.xml - XML 기반의 매퍼파일과 인터페이스 기반의 매퍼파일을 바인딩하여 사용함
<?xml version="1.0" encoding="UTF-8"?>
<!DOCTYPE mapper PUBLIC "-//mybatis.org//DTD Mapper 3.0//EN" "<https://mybatis.org/dtd/mybatis-3-mapper.dtd>">

<!-- Interface Mapper 파일과 바인딩 하기 위한 namespace 속성값으로 Interface Mapper 파일의 경로 설정 -->
<!-- => StudentDAO 인터페이스가 StudentMapper 인터페이스와 동일하게 작성해야 하므로
 		Mapper 대신 DAO 사용할거면 namespace 속성값으로 [xyz.itwill10.dao.StudentDAO]로 작성 가능하지만
 		보통 Mapper 인터페이스를 Mapper 패키지에 따로 작성해 사용함-->
<mapper namespace="xyz.itwill10.mapper.StudentMapper">

	<!-- Interface Mapper 파일과 바인딩할 경우 parameterType 속성 생략 가능 -->
	<insert id="insertStudent">
		insert into student values(#{no},#{name},#{phone},#{address},#{birthday})
	</insert>

	<!-- 검색행의 컬럼명과 DTO 클래스의 필드명이 같은 경우 resultType 속성을 사용하여 "자동 매핑" 처리 -->
  <!-- "수동 매핑"은 resultMap 이용 -->
	<select id="selectStudentList" resultType="Student">
		select * from student order by no
	</select>

</mapper>
💛[Mapper] StudentMapper.java
package xyz.itwill10.mapper;

import java.util.List;

import xyz.itwill10.dto.Student;

public interface StudentMapper {
	int insertStudent(Student student);
	List<Student> selectStudentList();
}
03. @Repository
💛[DAO] (부모) StudentDAO.java
package xyz.itwill10.dao;

import java.util.List;

import xyz.itwill10.dto.Student;

public interface StudentDAO {
	int insertStudent(Student student);
	List<Student> selectStudentList();
}
💛[DAO] (자식) StudentDAOImpl.java - 핵심) SqlSession 객체를 만들 수 있는 필드 만든 후 인젝션 처리하는 것이 중요
package xyz.itwill10.dao;

import java.util.List;

import org.apache.ibatis.session.SqlSession;
import org.springframework.stereotype.Repository;

import lombok.RequiredArgsConstructor;
import xyz.itwill10.dto.Student;
import xyz.itwill10.mapper.StudentMapper;

//🌈SpringMVC Framework에 Mybatis Framework를 사용하여 DAO 클래스를 작성하는 방법
//step 1.
//DataSource 관련 라이브러리와 Mybatis 관련 라이브러리를 프로젝트에 빌드 처리 - 메이븐 : [pom.xml]
// => ojdbc, spring-jdbc(spring-tx), mybatis, mybatis-spring
// => ojdbc11(오라클 라이브러리),
// => spring-jdbc(spring-tx)(springDAO 관련 라이브러리/ 트랜잭션 라이브러리),
// => mybatis(인터페이스를 제공해주는 라이브러리)
// => mybatis-spring(인터페이스를 상속받아 클래스를 제공해주는 라이브러리 - sqlSessionFactoryBean클, sqlSessionTemplateBean클)
//step 2.
//Mybatis Framework의 환경설정파일 작성 - 생략 가능
// => [src/main/webapp] 폴더에 작성해야만 스프링 컨테이너(WebApplicationContenxt 객체)가 Mybatis Framework의 환경설정파일에 접근 가능
// => 환경설정에 따라 [src/main/java] 또는 [src/main/resources] 폴더에 작성 가능
//step 3.
//DataSource 관련 클래스, SqlSessionFactroy 관련 클래스, SqlSession 관련 클래스를 Spring Bean으로 등록
//=> SpringMVC Framework의 스프링 컨테이너를 초기화 처리하기 위한 Spring Bean Configuration File에서 bean 엘리먼트로 해당 클래스를 Spring Bean으로 등록
//=> [root-context.xml] 또는 [servlet-context.xml]
//step 4.
//테이블 생성 >> DTO 클래스 작성 >> 매퍼 파일 작성 >> DAO 클래스 작성 - 반복

//🌈Mybatis Framework의 로그 팩토리에 의해 생성된 로그 이벤트를 Spring Framework의 로그 구현체에게 전달하여 기록하는 방법
//step 1.
//log4jdbc-log4j2-jdbc4 라이브러리를 프로젝트에 빌드 처리 - 메이븐 : pom.xml

//step 2.
//DataSource 관련 클래스를 Spring Bean으로 등록한 Spring Bean Configuration File의
//bean 엘리먼트에서 driverClassName 필드값과 url 필드값 변경 - root-context.xml

//step 3.
//[src/main/resources] 폴더에 [log4jdbc.log4j2.properties] 파일 작성
// => Mybatis Framework의 로그 이벤트를 Spring Framework에게 전달하기 위한 SpyLogDelegator
//클래스를 지정하기 위한 파일

//step 4.
//SpyLogDelegator 객체에 의해 발생된 로그 이벤트를 SpyLogDelegator의 로그 구현체에 의해
//기록되도록 환경설정파일 변경 - log4j.xml : logger 엘리먼트 추가

//DAO 클래스 : 저장매체에게 행에 대한 삽입,변경,삭제,검색 기능을 제공하는 객체를 생성하기 위한 클래스
// => DAO 클래스의 메소드에서는 DBMS 서버에 SQL 명령을 전달하여 실행하고 실행결과를 제공받아
//Java 객체(원시값)으로 변환하여 반환되도록 작성
// => DAO 클래스가 변경돼도 의존관계로 설정된 Service 클래스에 영향을 최소화 하기 위해 인터페이스를 상속받아 작성

//DAO 클래스는 Service 클래스의 객체로 제공받아 사용되도록 반드시 Spring Bean으로 등록
// => DAO 클래스는 @Repository 어노테이션을 사용하여 Spring Bean으로 등록되도록 처리
// => [일반 클래스 = @Component] ,  [DAO 클래스 = @Repository]

// => @Repository 어노테이션을 사용하면 SQL 명령으로 발생되는 예외를 Spring 관련 예외로 제공되도록 처리
// => @Repository 어노테이션를 스프링 컨테이너가 처리하기 위해서는 반드시 클래스를 작성한 패키지를
//Spring Bean Configuration File(servlet-context.xml)의 component-scan 엘리먼트로 검색되도록 설정
@Repository

//@RequiredArgsConstructor : final 필드만 초기화 설정하는 생성자를 만들어 주는 어노테이션
// => 생성자가 하나만 작성된 경우 @Autowired 어노테이션 생략 가능
@RequiredArgsConstructor
public class StudentDAOImpl implements StudentDAO {

	//Mybatis Framework로 DAO 클래스를 작성할 경우 매퍼에 등록된 SQL 명령을 전달하여 실행하고
	//결과를 Java 객체(원시값)로 반환받기 위해 SqlSession 객체가 반드시 필요
	// => SqlSession 객체를 저장하기 위한 필드를 선언하고 스프링 컨테이너에 의해 관리되는
	//Spring Bean에서 SqlSession 관련 객체를 제공받아 필드에 인젝션 처리 - DI
	// => 필드를 초기화하는 생성자를 생성하여 @Autowired 어노테이션을 사용하여 의존성 주입 - 순환참조 방지
	private final SqlSession sqlSession;

	//방법1. 필드에 @Autowired - 교재에도 이렇게 사용함, 더 많이 사용
	//@Autowired
	//private SqlSession sqlSession;

	//방법2-1. 생성자에 @Autowired
	//@Autowired
	//public StudentDAOImpl() {
	//	this.sqlSession = sqlSession();
	//}

	//방법2-2. 생성자를 직접 생성하지 않고 [롬북 라이브러리] 이용
	// 단, 필드를 final 지정자로 선언 후 @RequiredArgsConstructor 작성

	@Override
	public int insertStudent(Student student) {
		return sqlSession.getMapper(StudentMapper.class).insertStudent(student);
	}
	@Override
	public List<Student> selectStudentList() {
		return sqlSession.getMapper(StudentMapper.class).selectStudentList();
	}

}
04. @Service
🖤[Service] (부모) StudentService.java
package xyz.itwill10.service;

import java.util.List;

import xyz.itwill10.dto.Student;

public interface StudentService {
	void addStudent(Student student);
	List<Student> getStudentList();
}
🖤[Service] (자식) StudentServiceImpl.java
- 원래 예외 발생시키도록 만들어야 함 - 왜?
- DAO에서 발생하는 예외(예전에 try-catch구문 만들었던 것 생각하기)를 Service로 떠넘기니까~
package xyz.itwill10.service;

import java.util.List;

import org.springframework.stereotype.Service;

import lombok.RequiredArgsConstructor;
import xyz.itwill10.dao.StudentDAO;
import xyz.itwill10.dto.Student;

//Service 클래스 : 요청 처리 메소드에서 데이타 처리 관련 기능을 모듈화하여 제공하는 객체를 생성하기 위한 클래스
// => Service 클래스의 메소드에서는 데이타 처리에 필요한 다수의 DAO 클래스의 메소드를 호출하여
//프로그램이 필요한 데이타 처리 기능을 모듈화하여 제공하도록 작성
// => Service 클래스가 변경돼도 의존관계로 설정된 Controller 클래스에 영향을 최소화 하기 위해 인터페이스를 상속받아 작성

//Service 클래스는 Controller 클래스의 객체로 제공받아 사용되도록 반드시 Spring Bean으로 등록

// => Service 클래스는 @Service 어노테이션을 사용하여 Spring Bean으로 등록되도록 처리
// => @Service 어노테이션을 사용하여 TansactionManager 객체에 의해 트렌젝션 관리 가능
// => @Service 어노테이션를 스프링 컨테이너가 처리하기 위해서는 반드시 클래스를 작성한 패키지를
//Spring Bean Configuration File(servlet-context.xml)의 component-scan 엘리먼트로 검색되도록 설정
@Service

@RequiredArgsConstructor
public class StudentServiceImpl implements StudentService {

	//Service 클래스의 메소드에서 사용될 DAO 객체를 저장하기 위한 필드 선언
	// => @Autowired 어노테이션을 사용한 생성자로 필드의 인젝션 처리
	private final StudentDAO studentDAO;

	@Override
	public void addStudent(Student student) {
		studentDAO.insertStudent(student);
	}

	//List보다 Map으로 반환되는 경우가 더 많음!!
	@Override
	public List<Student> getStudentList() {
		return studentDAO.selectStudentList();
	}

}
05. @Controller
🖤[Controller] StudentController.java
- 요청처리클래스 → 요청처리메소드 - Model 역할을 할 것임
- Service 클래스를 객체로 제공받아 요청 처리 메소드 내에서 Service 객체의 메소드를 호출함
package xyz.itwill10.controller;

import org.springframework.stereotype.Controller;
import org.springframework.ui.Model;
import org.springframework.web.bind.annotation.ModelAttribute;
import org.springframework.web.bind.annotation.RequestMapping;
import org.springframework.web.bind.annotation.RequestMethod;

import lombok.RequiredArgsConstructor;
import xyz.itwill10.dto.Student;
import xyz.itwill10.service.StudentService;

//🌈Spring Framework를 사용하여 웹프로그램을 작성하는 방법
//step 1. 테이블 만들기
//step 2. DTO 클래스 만들기
//step 3. DAO 클래스 만들기 - Mybatis 프레임워크 이용
//step 4. Service 클래스 만들기 - DAO클래스의 메소드 중 필요한 것들 조합해 모듈화 처리
//step 5. Controller 클래스 만들기 - Model(요청처리메소드) 역할
//step 6. 테스트 프로그램(JUnit) - 단위 프로그램(모듈) 테스트 하기 - DAO,Service,Controller가 제대로 동작되는가?
//step 7. HTML문서를 JSP 문서로 변환하기
//step 8. 통합 프로그램 테스트 하기 - 브라우저 이용

//Controller 클래스 : 클라이언트 요청을 처리하기 위한 기능의 객체를 생성하기 위한 클래스
// => Controller 클래스는 Front Controller(DispatcherServlet 객체)의 객체로 제공받아 사용되도록 반드시 Spring Bean으로 등록
// => @Controller 클래스는 @Controller 어노테이션을 사용하여 Spring Bean으로 등록되도록 처리
// => @Controller 어노테이션을 사용하면 클라이언트 요청에 의해 호출될 요청 처리 메소드 작성
// => @Controller 어노테이션를 스프링 컨테이너가 처리하기 위해서는 반드시 클래스를 작성한 패키지를
//Spring Bean Configuration File(servlet-context.xml)의 component-scan 엘리먼트로 검색되도록 설정
@Controller
//@RequestMapping 어노테이션을 클래스에 선언하면 Controller 클래스의 모든 요청 처리 메소드에 요청 URL 주소 앞부분에 공통적으로 포함될 URL 주소를 제공
@RequestMapping("/student")
@RequiredArgsConstructor
public class StudentController {

	//Controller 클래스의 요청 처리 메소드에서 사용될 Service 객체를 저장하기 위한 필드 선언
	// => @Autowired 어노테이션을 사용한 생성자로 필드의 인젝션 처리
	private final StudentService studentService;

	//[GET] 방식의 요청처리메소드 "/student/add"
	//학생정보를 입력받기 위한 JSP 문서 관련 뷰이름을 반환하는 요청 처리 메소드
	//@RequestMapping(value = "/student/add", method = RequestMethod.GET)
	@RequestMapping(value = "/add", method = RequestMethod.GET)
	public String add() {
		return "student/student_add"; //패턴: [*/*]
	}

	//[POST] 방식의 요청처리메소드 "/student/add"
	//학생정보를 전달받아 STUDENT 테이블에 삽입하고 회원목록 출력페이지를 요청할 수 있는
	//URL 주소를 클라이언트에게 전달하는 요청 처리 메소드
	//@RequestMapping(value = "/student/add", method = RequestMethod.POST)
	@RequestMapping(value = "/add", method = RequestMethod.POST)
	public String add(@ModelAttribute Student student,Model model) {
		try {
			//STUDENT 테이블에 학생정보 삽입시 PK 제약조건에 의해 예외 발생 가능
			studentService.addStudent(student);
		} catch (Exception e) {
			model.addAttribute("message", "이미 사용중인 학번을 입력 하였습니다.");
			return "student/student_add";
		}
		return "redirect:/student/display";//리다이렉트 이동
	}

	//요청처리메소드 "/student/display”
	//STUDENT 테이블에 저장된 모든 학생정보를 검색하여 속성값으로 저장하고 학생목록을 출력하는
	//JSP 문서 관련 뷰이름을 반환하는 요청 처리 메소드
	//@RequestMapping("/student/display")
	@RequestMapping("/display")
	public String display(Model model) {
		model.addAttribute("studentList",studentService.getStudentList());
		return "student/student_display"; //패턴: [*/*]
	}

}
06. 모듈테스트
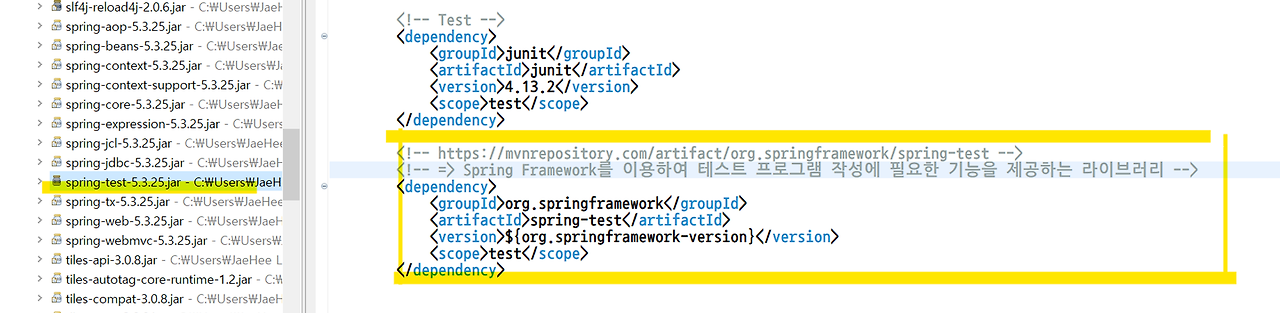
🌈테스트 관련 라이브러리 프로젝트에 빌드 처리
- junit 라이브러리(이미 존재) 와 spring-test 라이브러리 프로젝트에 빌드 처리 필요
- 테스트 프로그램 실행 시 유의
- ctrl+F11 : 실행 시 JunitTest 이용하기
🌈llog4j.xml
<?xml version="1.0" encoding="UTF-8"?>
<!DOCTYPE log4j:configuration PUBLIC "-//APACHE//DTD LOG4J 1.2//EN" "<http://logging.apache.org/log4j/1.2/apidocs/org/apache/log4j/xml/doc-files/log4j.dtd>">
<log4j:configuration xmlns:log4j="<http://jakarta.apache.org/log4j/>">
<!-- Appenders -->
<appender name="console" class="org.apache.log4j.ConsoleAppender">
<param name="Target" value="System.out" />
<layout class="org.apache.log4j.PatternLayout">
<param name="ConversionPattern" value="%-5p: %c - %m%n" />
</layout>
</appender>
<!-- Application Loggers -->
<logger name="xyz.itwill.controller">
<level value="info" />
</logger>
<!-- 3rdparty Loggers -->
<logger name="org.springframework.core">
<level value="info" />
</logger>
<logger name="org.springframework.beans">
<level value="info" />
</logger>
<logger name="org.springframework.context">
<level value="info" />
</logger>
<logger name="org.springframework.web">
<level value="info" />
</logger>
<logger name="jdbc.sqlonly">
<level value="info" />
</logger>
<!-- jdbc.sqltiming : SQL 명령의 실행시간(ms) 기록 -->
<logger name="jdbc.sqltiming">
<level value="info" />
</logger>
<!-- jdbc.audit : ResultSet 관련 매핑 정보를 제외한 모든 JDBC 관련 정보 기록 -->
<logger name="jdbc.audit">
<level value="info" />
</logger>
<!-- jdbc.resultsettable : ResultSet 관련 매핑 정보를 표(Table)형식으로 기록 -->
<logger name="jdbc.resultsettable">
<level value="info" />
</logger>
<!-- jdbc.connection : Connection 객체 관련 정보 기록 - Open 또는 Close -->
<logger name="jdbc.connection">
<level value="info" />
</logger>
<!-- Root Logger -->
<root>
<priority value="info" />
<appender-ref ref="console" />
</root>
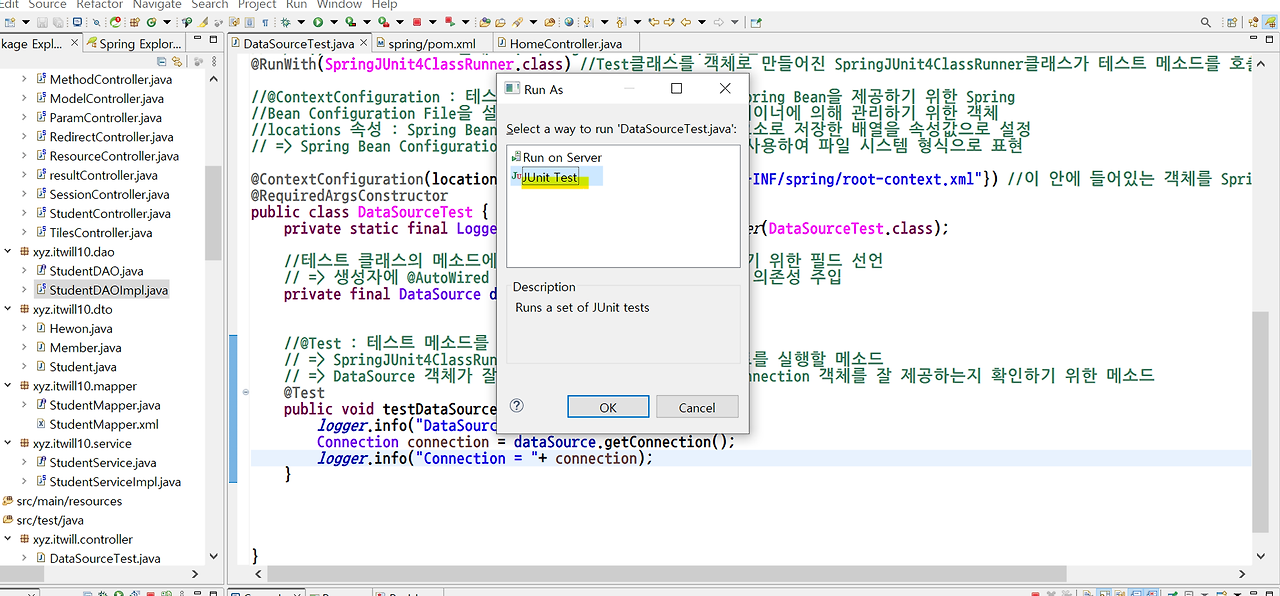
</log4j:configuration>1) 🔨DataSourceTest.java
- WAS를 start 하지 않아도 객체가 잘 만들어지고, 객체로부터 Connection을 잘 제공받는지 확인하는 테스트
package xyz.itwill.controller;

import java.sql.Connection;
import java.sql.SQLException;

import javax.sql.DataSource;

import org.junit.Test;
import org.junit.runner.RunWith;
import org.slf4j.Logger;
import org.slf4j.LoggerFactory;
import org.springframework.beans.factory.annotation.Autowired;
import org.springframework.test.context.ContextConfiguration;
import org.springframework.test.context.junit4.SpringJUnit4ClassRunner;

//🌈 Spring Framework를 사용하여 테스트 프로그램을 작성하여 단위 프로그램(모듈)을 테스트 하는 방법
// => SpringMVC에서의 모듈 : DAO 클래스, Service 클래스, Controller 클래스의 메소드

//1. - 딱 1번만 세팅하면 됨
//junit 라이브러리와 spring-test 라이브러리를 프로젝트에 빌드 처리 - 메이븐 : pom.xml

//2.  - 딱 1번만 세팅하면 됨
//테스트 프로그램에서 사용될 로그 구현체의 환경설정파일 변경
// => [src/test/resources] 폴더의 log4j.xml 파일의 내용 수정

//3.
//[src/test/java] 폴더에 테스트 프로그램에 대한 클래스 작성
// => junit 라이브러리와 spring-test 라이브러리에서 scope 속성을 주석 처리해야 테스트
//프로그램 관련 클래스 작성 가능 - 테스트 프로그램 실행 후 주석 제거

//4.테스트 프로그램(JUnit) 실행 - 모듈 테스트

// @RunWith : 테스트 프로그램의 클래스를 객체로 생성하여 테스트 메소드를 호출하기 위한 클래스를
// 설정하는 어노테이션 - 테스트 클래스를 실행하기 위한 클래스 설정하는 어노테이션
// => 즉, 테스트 클래스를 Junit 가지고 실행하기 위해 설정함
// value 속성 : 테스트 클래스를 실행하기 위한 클래스(Class 객체)를 속성값으로 설정
// => 다른 속성이 없는 경우 속성값만 설정 가능
// SpringJUnit4ClassRunner 클래스를 사용하여 테스트 클래스를 실행할 경우 ApplicationContext
// 객체(Spring Container)가 생성되어 제공 - 스프링 컨테이너를 제공받아 테스트 클래스를 동작시킬 수 있음
// => @RunWith(SpringJUnit4ClassRunner.class) 해석: 스프링 컨테이너를 제공해줘!!

// @ContextConfiguration : 테스트 클래스에서 사용할 수 있는 Spring Bean를 제공하기 위한 Spring
// Bean Configuration File을 설정하는 어노테이션 - 스프링 컨테이너에 의해 관리하기 위한 객체
// locations 속성 : Spring Bean Configuration File의 경로를 요소로 저장한 배열을 속성값으로 설정
// => Spring Bean Configuration File의 경로는 file 접두사를 사용하여 파일 시스템 형식으로 표현
//[context.xml] 파일에 들어있는 스프링 빈을 이용해 객체를 제공받아 사용할 것임

@RunWith(SpringJUnit4ClassRunner.class)
@ContextConfiguration(locations = {"file:src/main/webapp/WEB-INF/spring/root-context.xml"})
public class DataSourceTest {

	private static final Logger logger=LoggerFactory.getLogger(DataSourceTest.class);

	//테스트 클래스의 메소드에서 사용할 객체를 저장하기 위한 필드 선언
	// => @AutoWired 어노테이션을 필드에 사용하여 의존성 주입 - 생성자를 이용한 의존성 주입 불가능
	@Autowired
	private DataSource dataSource;

	//@Test : 테스트 메소드를 설정하는 어노테이션
	// => SpringJUnit4ClassRunner에 의해 호출되어 모듈 테스트를 실행할 메소드
	@Test
	public void testDataSource() throws SQLException {
		logger.info("DataSource = "+dataSource);
		Connection connection=dataSource.getConnection();
		logger.info("Connection = "+connection);
		connection.close();
	}

}
2) 🔨StudentServiceTest.java
- Servic 클래스의 메소드가 잘 동작되는지 확인
- 일반적으로 가장 많이 테스트 하는 Servic 클래스의 메소드
- 왜? 데이타 처리가 잘 되는지 확인해야 하기 때문
package xyz.itwill.controller;

import java.util.List;

import org.junit.FixMethodOrder;
import org.junit.Test;
import org.junit.runner.RunWith;
import org.junit.runners.MethodSorters;
import org.slf4j.Logger;
import org.slf4j.LoggerFactory;
import org.springframework.beans.factory.annotation.Autowired;
import org.springframework.test.context.ContextConfiguration;
import org.springframework.test.context.junit4.SpringJUnit4ClassRunner;
import org.springframework.test.context.web.WebAppConfiguration;

import xyz.itwill10.dto.Student;
import xyz.itwill10.service.StudentService;

// 테스트 클래스의 메소드에서는 일반적으로 Service 클래스의 메소드 또는 Controller 클래스의
// 메소드를 호출하여 메소드가 정상적으로 동작되는지를 검사할 목적으로 작성

// @WebAppConfiguration : ApplicationContext 객체가 아닌 WebApplicationContext 객체로 스프링 컨테이너 역활을 제공하도록 설정하기 위한 어노테이션
// "웹"어플리케이션으로 동작할 수 있도록 환경설정할게!! - 이렇게 해야 Controller 클래스의 메소드를 mockmvc를 호출해 요청해서 처리할 수 있음
// 사실 Service 클래스는 @WebAppConfiguration을 안써도 되지만 일반적으로 SpringMVC 패턴(웹어플리케이션 만들경우)은 써주는게 좋음

// @FixMethodOrder : 테스트 메소드의 [호출순서]를 설정하기 위한 어노테이션
// value 속성 : MethodSorters 자료형(Enum)의 상수 중 하나를 속성값으로 설정
// => MethodSorters.DEFAULT : JUnit 프로그램의 내부 규칙에 의해 정렬되어 메소드 호출 - 테스트마다 동일한 순서로 메소드 호출 (한번 실행해보면 어떤 순서인지 알 수 있으나, 일반적으로 테스트 메소드 작성 순서대로 호출이 되긴 함. 하지만 확실치는 않음!!!)
// => MethodSorters.JVM : JVM에 의해 정렬되어 메소드 호출 - 테스트마다 불규칙한 순서로 메소드 호출 (즉, 랜덤호출임)
// => MethodSorters.NAME_ASCENDING : 테스트 메소드의 이름을 오름차순 정렬하여 메소드 호출 - 우리가 테스트하지 않아도 알기가 쉬움 - 알파벳순(A~Z) ex. test[A]ddStudent -> test[G]etStudentList
@RunWith(SpringJUnit4ClassRunner.class)
@WebAppConfiguration
@ContextConfiguration(locations = {"file:src/main/webapp/WEB-INF/spring/root-context.xml"
		,"file:src/main/webapp/WEB-INF/spring/appServlet/servlet-context.xml"})
@FixMethodOrder(value = MethodSorters.NAME_ASCENDING)
public class StudentServiceTest {
	private static final Logger logger=LoggerFactory.getLogger(StudentServiceTest.class);

	@Autowired
	private StudentService studentService;

	//테스트 메소드 여러개 만들 수 있으나, 메소드가 어떤 것이 먼저 호출되느냐의 순서도 있음
  	//예를 들어 아래처럼 testAddStudent 후 testGetStudentList 하는 것이 좋음 - @FixMethodOrder 이용
	@Test
	public void testAddStudent() {
		Student student=new Student();
		student.setNo(6000);
		student.setName("홍경래");
		student.setPhone("010-6781-4311");
		student.setAddress("서울시 중랑구");
		student.setBirthday("2000-09-10");
		studentService.addStudent(student);
	}

	@Test
	public void testGetStudentList() {
		List<Student> studentList=studentService.getStudentList();
		for(Student student:studentList) {
			//DTO 클래스의 toString() 메소드 호출 - 모든 필드값을 문자열로 변환하여 반환
			logger.info(student.toString());
		}
	}

}
3) 🔨StudentControllerTest.java
- 요청처리 메소드를 테스트 하려면 객체와 객체가 필요함
- 그런데 일반적으로 Controller 클래스의 메소드 테스트 보다 Service 클래스의 메소드 테스트 프로그램을 더 많이 만듦
- 왜? 사실 JSP(View)가 없어도 실행할 수 있음! 그냥 브라우저를 통해 요청하면 됨!!
- 만약 JSP 없이 컨트롤러(요청처리메소드)를 요청할 경우???
- InternalResourceViewResolver 이용 + 정상적인 요청 처리 메소드다??? - 404에러 : 보여질 뷰(JSP)가 없어서 발생하는 에러
- InternalResourceViewResolver 이용 + 요청처리 메소드가 없다??? - 404에러 : 보여질 뷰(JSP)가 없어서 발생하는 에러
- 콘솔에 No mapping for GET (매핑된 것이 없음 - 요청처리 메소드가 없는 것 )
- 그런데 TilesView를 이용한다??? - 조합해서 보여줄 JSP 문서가 업기 때문에 에러 발생..
- 메소드 내가 원하는 값들이 잘 전달되었는지 궁금하다??? - sysout 이용해 콘솔에 출력
package xyz.itwill.controller;

import org.junit.Before;
import org.junit.Test;
import org.junit.runner.RunWith;
import org.slf4j.Logger;
import org.slf4j.LoggerFactory;
import org.springframework.beans.factory.annotation.Autowired;
import org.springframework.test.context.ContextConfiguration;
import org.springframework.test.context.junit4.SpringJUnit4ClassRunner;
import org.springframework.test.context.web.WebAppConfiguration;
import org.springframework.test.web.servlet.MockMvc;
import org.springframework.test.web.servlet.MvcResult;
import org.springframework.test.web.servlet.request.MockMvcRequestBuilders;
import org.springframework.test.web.servlet.setup.MockMvcBuilders;
import org.springframework.web.context.WebApplicationContext;

//Service클 :  [{"file:src/main/webapp/WEB-INF/spring/root-context.xml","file:src/main/webapp/WEB-INF/spring/appServlet/servlet-context.xml"}]
// => 위처럼 서비스클래스를 테스트 할 때에는 일일이 하나씩 셋팅해서 Spring Bean Configuration File을 표현했다면,
//이번에는 패턴문자 이용
//[*] 패턴문자를 사용하여 Spring Bean Configuration File 설정 가능
// => [**] 형식으로 0개 이상의 하위 폴더를 표현 가능
@RunWith(SpringJUnit4ClassRunner.class)
@WebAppConfiguration
@ContextConfiguration(locations = {"file:src/main/webapp/WEB-INF/spring/**/*.xml"})
public class StudentControllerTest {

	private static final Logger logger=LoggerFactory.getLogger(StudentControllerTest.class);
	//WebApplicationContext 객체를 저장하기 위한 필드 선언 - DI
	// => WebApplicationContext 객체 : SpringMVC 프로그램에서 스프링 컨테이너 역활을 제공하기 위한 객체
	@Autowired
	private WebApplicationContext context;

	//2. MockMvc 객체를 mvc 필드에 저장함!
	//MockMvc 객체를 저장하기 위한 필드 선언
	// => MockMvc 객체 : 요청과 응답을 가상으로 제공하기 위한 객체
  	//=> MockMvc = 가상의 MVC 객체 (이 아이를 통해 요청과 응답을 받을 수 있음)
  	// => 브라우저가 있어야 요청과 응답을 할 수 있는데, JSP문서가 없으므로 브라우저를 이용할 수도 없음 그래서 MockMvc 이용
  	//=> @Autowired 작업을 못하므로 아래의 setUp() 메소드를 통해 객체를 생성해서 받환받음
	private MockMvc mvc; //일종의 FrontController 역할을 해줌...(?) 가상의 요청과 응답!!!!!!

	//1. setup 메소드를 통해 MockMvc 객체가 만들어지면~~
	//@Before : 테스트 메소드 호출 전 실행될 명령을 작성한 메소드를 설정하는 어노테이션 - 초기화 작성
  	//=> 반드시 무조건 1번 호출됨 - 즉, 생성자 대신 초기화 작업을 해줄 것임
	@Before
	public void setup() {
		//MockMvcBuilders.webAppContextSetup(WebApplicationContext context)
		// => MockMvcBuilder 객체를 생성하여 반환하기 위한 메소드
		//MockMvcBuilder.build() : MockMvc 객체를 생성하여 반환하기 위한 메소드
		mvc=MockMvcBuilders.webAppContextSetup(context).build();
		logger.info("MockMvc 객체 생성");
	}

	@Test
	public void testStudentDisplay() throws Exception {

		//MockMvc.perform(Builder requestBuilder) : 가상으로 페이지를 요청하는 메소드
		// => Controller 클래스에서 해당 페이지의 요청 처리 메소드 호출
		// => 요청에 대한 처리결과가 저장된 ResultActions 객체 반환

		//MockMvcRequestBuilders.get(String url) : URL 주소를 전달받아 GET 방식으로 요청하는 메소드
    	//Get 이나 Post 방식으로 요청가능함!!
		// => 페이지에 대한 URL 주소의 요청 관련 정보(리퀘스트 메세지)가 저장된 [Builder 객체] 반환
    	// => 리퀘스트 메세지의 필요한 메소드 다 집어넣을 수 있음 (밑의 그림 참고)

		//ResultActions.andReturn() : 요청 처리 메소드의 실행 결과를 MvcResult 객체로 반환하는 메소드
		MvcResult result=mvc.perform(MockMvcRequestBuilders.get("/student/display")).andReturn();

		logger.info(result.getModelAndView().getViewName());
		logger.info(result.getModelAndView().getModel().toString());
	}

}
반응형