
목차
-
01. 스프링 Bean 클래스 생성법
-
1) ApplicationContext 객체 사용의 장점
-
2) 일종의 DAO클래스
-
3) 💖Spring Bean Configuration File
-
4) 일종의 요청처리
-
02. 🌈스프링 Bean 클래스 속성 설정방법🌈
-
1) Bean 클래스 등록 시 사용 가능한 속성들
-
2) 일종의 DAO클래스
-
3) 💖Spring Bean Configuration File
-
4) 일종의 요청처리
-
03. 🌈어노테이션을 이용한 Bean 클래스 속성 설정방법🌈
-
1) 💖Spring Bean Configuration File
-
2) 비권장
-
3) 권장
반응형
01. 스프링 Bean 클래스 생성법
- 🍭BeanFactory 객체를 생성하여 스프링 컨테이너로 사용
- 🍡ApplicationContext 객체를 생성하여 스프링 컨테이너로 사용 - 권장

1) ApplicationContext 객체 사용의 장점
- xml 파일을 읽는 것이 쉬움
- 미리 객체를 만들어주기 때문에 빠르게 접근해 객체 사용할 수 있음
- 스프링을 초기화 처리할 수 있는 다양한 메소드들이 매우 많음
- ApplicationContext 객체를 제거하는 메소드도 사용 가능 - 객체는 미리 만들어지지만 사용 안하면 지울 수 있으므로 메모리 관리 효율적
- 나중에 Spring MVC 만들 때 WebApplicationContext객체 (ApplicationContext객체의 자식)을 이용해 만듦
- 또한 BeanFactory 객체는 Inject기능도 많이 없음
2) 일종의 DAO클래스
src.main.java > xyz.itwill04.bean > CreateBean.java
package xyz.itwill04.bean;

public class CreateBean {

	public CreateBean() {
		System.out.println("### CreateBean 클래스의 기본 생성자 호출 ###");
	}

	public void display() {
		System.out.println("*** CreateBean 클래스의 display() 메소드 호출 ***");
	}

}3) 💖Spring Bean Configuration File
[src.main.resources > 04-1_beanCreate.xml] : 스프링 컨테이너로부터 스프링 빈을 등록하여 사용함
<?xml version="1.0" encoding="UTF-8"?>
<beans xmlns="<http://www.springframework.org/schema/beans>"
	xmlns:xsi="<http://www.w3.org/2001/XMLSchema-instance>"
	xsi:schemaLocation="<http://www.springframework.org/schema/beans> <http://www.springframework.org/schema/beans/spring-beans.xsd>">
	<!-- Spring Bean Configuration File을 여러개 작성하여 사용하는 이유 -->
	<!-- => 하나의 Spring Bean Configuration File을 사용하여 Spring Bean을 설정할 경우 가독성 및 유지보수의 비효율성 증가 -->

	<!-- import 엘리먼트 -->
	<!-- import : 다른 Spring Bean Configuration File의 Spring Bean 정보를 제공받아 포함하는 엘리먼트 -->
	<!-- resource속성: 포함될 Spring Bean Configuration File의 경로를 속성값으로 설정 -->
	<!-- <import resource="03_message.xml"/>  -->


	<!-- bean 엘리먼트 -->
	<!-- bean : 스프링 컨테이너에게 Spring Bean 관련 정보를 제공하기 위한 엘리먼트 -->
	<!-- => Spring Bean : 스프링 컨테이너에 의해 관리(생성, 사용, 소멸)되는 객체(클래스) -->
	<!-- class 속성: Spring Bean으로 등록되어 사용될 클래스를 속성값으로 설정 - 필수 -->
	<!-- => class 속성값은 이클립스의 자동완성 기능을 사용하여 작성 가능 -->
	<!-- id 속성:  Spring Bean을 구분하기 위한 식별자를 속성값으로 설정 -->
	<!-- => id 속성대신 name 속성을 사용하여 식별자(BeanId 또는 BeanName) 설정 가능 -->
	<!-- => id 속성값은 클래스 이름(부모 인터페이스 이름)을 이용하여 설정하는 것을 권장 -->
	<!-- => id 속성값은 class 속성이 설정되어 있는 경우 이클립스의 자동완성 기능을 사용하여 작성 가능 -->
	<bean class="xyz.itwill04.bean.CreateBean" id="createBean"/>

</beans>4) 일종의 요청처리
src.main.java > xyz.itwill04.bean > CreateBeanApp.java
package xyz.itwill04.bean;

import org.springframework.beans.factory.BeanFactory;
import org.springframework.beans.factory.xml.XmlBeanFactory;
import org.springframework.context.ApplicationContext;
import org.springframework.context.support.ClassPathXmlApplicationContext;
import org.springframework.core.io.FileSystemResource;

//Spring Framework에서는 BeanFactory객체(과거에많이사용) 또는 ApplicationContext객체(현재많이사용)로 스프링 컨테이너(Spring Container)기능 제공
//=> 스프링 컨테이너는 환경설정파일(Spring Bean Configuration File - XML)을 제공받아 클래스의 객체(Spring Bean)를 관리
public class CreateBeanApp {
	public static void main(String[] args) {

		//1.
		//🍭BeanFactory객체를 생성하여 스프링 컨테이너로 사용
		System.out.println("1.BeanFactory 객체를 생성하여 스프링 컨테이너로 사용");
		System.out.println("============= Spring Container 초기화 전 ============="); //XML 파일 읽어들이기 전이다..!

		//BeanFatory 인터페이스를 상속받은 클래스로 객체를 생성 - BeanFactory 객체
		//=> BeanFactory 객체를 생성할 때 Spring Bean Configuration File를 제공받아 스프링 컨테이너 생성 - 스프링 컨테이너 초기화 작업
		//=> Spring Bean Configuration File의 파일 경로를 모두 표현하여 설정 - 단점) 배포 시 경로설정이 변경되므로 불편

		//=> BeanFactory 객체는 Spring Bean Configuration File에 등록된 클래스로 미리 객체를 생성하지 않고 Spring Bean 요청 시 객체를 생성하여 제공
    	//=> FileSystemResource 객체를 이용해 파일 경로를 쉽게 표현함
    	@SuppressWarnings("deprecation")
		BeanFactory factory = new XmlBeanFactory(new FileSystemResource("src/main/resources/04-1_beanCreate.xml"));
		System.out.println("============= Spring Container 초기화 후 ============="); //XML 파일을 읽어들였다..!

		//BeanFactory.getBean(String beanName) : 스프링 컨테이너에게 Spring Bean을 구분하기 위한 식별자(beanId 또는 beanName)를 전달하여 객체(Spring Bean)를 생성하여 반환하는 메소드
		//=> Object 타입의 객체를 반환하므로 반드시 명시적 객체 형변환 사용
		//=> 전달받은 식별자(beanName)에 대한 Spring Bean이 없는 경우 NoSuchBeanDefinitionException 예외 발생 - null을 주지는 않음
		CreateBean bean1 = (CreateBean)factory.getBean("createBean");
		bean1.display();

		//따로 객체 소멸 메소드 작성 안해도 됨
		System.out.println("======================================================");
		//2.
		//🍡ApplicationContext객체를 생성하여 스프링 컨테이너로 사용
		System.out.println("2. ApplicationContext 객체를 생성하여 스프링 컨테이너로 사용");
		System.out.println("============= Spring Container 초기화 전 ============="); //XML 파일 읽어들이기 전이다..!

		//ApplicationContext 인터페이스를 상속받은 클래스로 객체를 생성 - ApplicationContext 객체
		//=> ApplicationContext 객체를 생성할 때 Spring Bean Configuration File를 제공받아 스프링 컨테이너 생성 - 스프링 컨테이너 초기화 작업
		//=> 클래스가 참조 가능한 디렉토리(ClassPath)에 있는 Spring Bean Configuration File을 표현하여 설정

		//=> ApplicationContext 객체는 Spring Bean Configuration File에 등록된 클래스로 미리 객체를 생성하여 Spring Bean 요청 시 제공
    	//=> 현재로써 사용하기 가장 편한 객체인 ClassPathXmlApplicationContext로 이용해 만듦
		ApplicationContext context = new ClassPathXmlApplicationContext("04-1_beanCreate.xml");
		System.out.println("============= Spring Container 초기화 후 ============="); //XML 파일을 읽어들였다..!

		//DL(Dependecy Lookup) : 스프링 컨테이너로부터 필요한 Spring Bean을 검색하여 제공하는 기능
		//ApplicationContext.getBean(String beanName) : 스프링 컨테이너에게 Spring Bean을 구분하기 위한 식별자(beanId 또는 beanName)를 전달하여 객체(Spring Bean)를 생성하여 반환하는 메소드
		//=> Object 타입의 객체를 반환하므로 반드시 명시적 객체 형변환 사용
		CreateBean bean2 = (CreateBean)factory.getBean("createBean");
		bean2.display();

		//ClassPathXmlApplicationContext.close() : ApplicationContext 객체를 제거하는 메소드
		//=> 스프링 컨테이너에 의해 관리되는 모든 객체(Spring Bean) 자동 소멸
		((ClassPathXmlApplicationContext)context).close(); //해도 되고 안해도 됨- 나중에 자동으로 소멸되니..
		System.out.println("======================================================");
	}

}

02. 🌈스프링 Bean 클래스 속성 설정방법🌈
1) Bean 클래스 등록 시 사용 가능한 속성들


2) 일종의 DAO클래스
🖤destroy-method 속성 이용하기 위한 클래스 - InitDestroyMethodBean.java
package xyz.itwill04.bean;

public class InitDestroyMethodBean /*implements BeanNameAware*/ {

	public InitDestroyMethodBean() {
		System.out.println("### InitDestroyMethodBean 클래스의 기본 생성자 호출 ###");
	}

	//객체 생성 후 객체의 초기화 작업(필드의 초기값 설정)을 위해 한번만 자동 호출되는 메소드
	public void init() {
		System.out.println("*** CreateBean 클래스의 init() 메소드 호출 ***");
	}

	//객체 소멸 전 객체의 마무리 작업을 위해 한번만 자동 호출되는 메소드
	public void destroy() {
		System.out.println("*** CreateBean 클래스의 destroy() 메소드 호출 ***");
	}

	public void display() {
		System.out.println("*** CreateBean 클래스의 display() 메소드 호출 ***");
	}

	/*
	//클래스명 변경하고 싶을 때 BeanNameAware 인터페이스를 상속받아 아래처럼 오버라이드 작성
	//이 외 Aware 인터페이스는 매우 많음 -> 생성되는 객체의 초기화작업을 쉽게 도와줌, 잘 사용은 안함
	private String beanName;

	@Override
	public void setBeanName(String name) {
		this.beanName= beanName;
	}
	*/

}
🖤lazy-init 속성 이용하기 위한 클래스 - LazyInitBean.java
package xyz.itwill04.bean;

public class LazyInitBean {
	public LazyInitBean() {
		System.out.println("### LazyInitBean 클래스의 기본 생성자 호출 ###");
	}
}
🖤factory-method 속성 이용하기 위한 클래스 - FactoryMethodBean.java
package xyz.itwill04.bean;

//싱글톤 디자인 패턴을 적용하여 작성된 클래스 - 싱글톤 클래스(Singleton Class)
// => 프로그램에 필요한 객체를 하나만 제공하기 위한 목적의 클래스 작성 시 사용하는 디자인 패턴
public class FactoryMethodBean {
	private static FactoryMethodBean _bean;

	private FactoryMethodBean() {
		System.out.println("### FactoryMethodBean 클래스의 기본 생성자 호출 ###");
	}

	static {
		_bean = new FactoryMethodBean();
	}

	public static FactoryMethodBean getFactoryMethodBean() {
		System.out.println("*** FactoryMethodBean 클래스의 getFactoryMethodBean() 메소드 호출 ***");
		return _bean;
	}
}
🖤depends-on 속성 이용하기 위한 클래스 - DependsOnOneBean.java & DependsOnTwoBean.java
package xyz.itwill04.bean;

public class DependsOnOneBean {
	public DependsOnOneBean() {
		System.out.println("### DependsOnOneBean 클래스의 기본 생성자 호출 ###");
	}
}
package xyz.itwill04.bean;

public class DependsOnTwoBean {
	public DependsOnTwoBean() {
		System.out.println("### DependsOnTwoBean 클래스의 기본 생성자 호출 ###");
	}
}
🖤scope 속성 이용하기 위한 클래스 - ScopeBean.java
package xyz.itwill04.bean;

public class ScopeBean {
	public ScopeBean() {
		System.out.println("### ScopeBean 클래스의 기본 생성자 호출 ###");
	}
}
3) 💖Spring Bean Configuration File
[04-2_beanAttribute.xml]
<?xml version="1.0" encoding="UTF-8"?>
<beans xmlns="<http://www.springframework.org/schema/beans>"
	xmlns:xsi="<http://www.w3.org/2001/XMLSchema-instance>"
xsi:schemaLocation="<http://www.springframework.org/schema/beans> <http://www.springframework.org/schema/beans/spring-beans.xsd>">init-method 속성
	<!-- init-method 속성 : 스프링 컨테이너에 의해 객체(Spring Bean)가 생성된 후 한번만 자동
	호출되어 생성 객체의 초기화 작업을 실행하기 위한 메소드의 이름을 속성값으로 설정 -->
	<!-- => init-method 속성값은 이클립스이 자동완성 기능을 사용하여 작성 가능 -->
	<!-- destroy-method 속성 : 스프링 컨테이너에 의해 객체(Spring Bean)가 소멸되기 전 한번만 자동
	호출되어 생성 객체의 마무리 작업을 실행하기 위한 메소드의 이름을 속성값으로 설정 -->
	<!-- => destroy-method 속성값은 이클립스이 자동완성 기능을 사용하여 작성 가능 -->
	<bean class="xyz.itwill04.bean.InitDestroyMethodBean" id="initDestroyMethodBean"
		init-method="init" destroy-method="destroy"/>
lazy-init 속성
	<!-- lazy-init 속성 : false 또는 true 중 하나를 속성값으로 설정 -->
	<!-- => false(기본) : 스프링 컨테이너를 초기화할 때 객체(Spring Bean)를 미리 생성함-->
	<!-- => true : 스프링 컨테이너로부터 객체(Spring Bean)를 제공받기 위해 getBean() 메소드를 호출할 때 생성함-->
	<bean class="xyz.itwill04.bean.LazyInitBean" id="lazyInitBean" lazy-init="true"/>
factory-method 속성 : 다른 사람이 만든 것을 가져다 쓸 때 싱글톤으로 제공받아야 한다면 factory-method 속성 이용함 - 거의 사용할 일은 없긴함
	<!-- 스프링 컨테이너는 Spring Bean Configuration File에 등록된 모든 클래스를
    리플렉션 기술을 사용하여 미리 객체(Spring Bean)로 생성 -->
	<!-- => 리플렉션 기술을 사용하면 클래스의 접근 지정자에 상관없이 모든 요소에 접근 가능  -->
	<!-- => 생성자가 은닉화 선언되어 있어도 스프링 컨테이너는 클래스의 생성자로 객체
	생성 가능 -->
	<!-- Spring Bean Configuration File에 등록된 싱글톤 클래스는 클래스가 메모리에
 	로딩된 후 정적영역의 명령을 실행하여 객체를 생성하고 스프링 컨테이너에 의해 객체를
	다시 생성함 - 객체가 2개 만들어짐 -->
	<!-- => 싱글톤 클래스에 의해 객체가 2개 생성 - 싱글톤 클래스의 작성 규칙 위반 -->

	<!-- factory-method 속성 : 싱글톤 클래스에서 객체를 반환하는 메소드의 이름을
	속성값으로 설정 -->
	<!-- => 스프링 컨테이너에 의해 객체를 생성하지 않고 정적영역의 명령으로 객체를 생성하여
 	사용 -->
	<bean class="xyz.itwill04.bean.FactoryMethodBean" factory-method="getFactoryMethodBean"/>
depends-on 속성
	<!-- 스프링 컨테이너는 bean 엘리먼트의 선언 순서대로 등록된 클래스를 객체로 생성 -->
	<!-- depends-on 속성 : Spring Bean을 구분하기 위한 식별자(beanName)를 속성값으로 설정 -->
	<!-- => bean 엘리먼트에 등록된 클래스를 객체로 생성하기 전에 속성값으로 설정된
	Spring Bean의 클래스를 객체로 미리 생성 -->
	<bean class="xyz.itwill04.bean.DependsOnOneBean" depends-on="dependsOnTwoBean"/>
	<bean class="xyz.itwill04.bean.DependsOnTwoBean" id="dependsOnTwoBean"/>
scope 속성
	<!-- scope 속성 : singleton(기본), prototype, request, session 중 하나를 속성값으로 설정 -->
	<!-- singleton 또는 prototype : 객체(spring Bean)의 생성 갯수를 설정하는 속성값 -->
	<!-- singleton : 스프링 컨테이너가 bean 엘리먼트에 등록된 클래스로 객체를 하나만 생성하여 제공 -->
	<!-- prototype : 스프링 컨테이너가 bean 엘리먼트에 등록된 클래스로 객체를 여러개 생성하여 제공 -->
	<!-- => scope 속성값을 [prototype]으로 설정할 경우 lazy-init 속성값을 반드시 [true]로 설정 -->
	<!--  request 또는 session : 객체(spring Bean)의 사용 범위를 설정하는 속성값 - 웹프로그램 작성 시에만 사용 -->
	<bean class="xyz.itwill04.bean.ScopeBean" id="singletonBean" lazy-init="true" scope="singleton"/>
	<bean class="xyz.itwill04.bean.ScopeBean" id="prototypeBean" lazy-init="true" scope="prototype"/>
</beans>
4) 일종의 요청처리
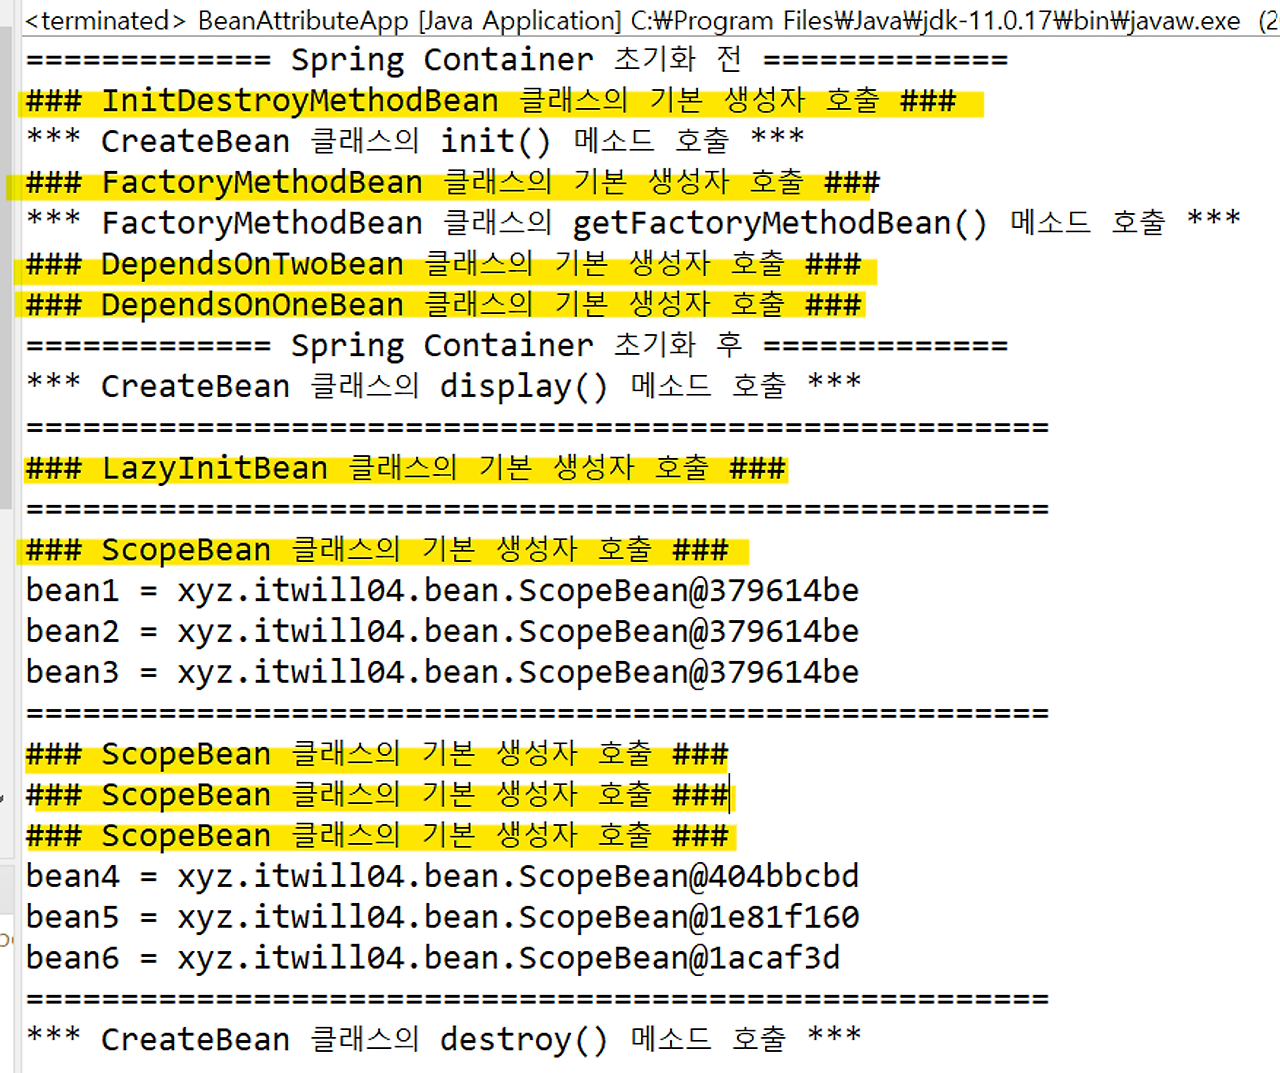
BeanAttributeApp.java
package xyz.itwill04.bean;

import org.springframework.context.ApplicationContext;
import org.springframework.context.support.ClassPathXmlApplicationContext;

public class BeanAttributeApp {
	public static void main(String[] args) {
		System.out.println("============= Spring Container 초기화 전 =============");
		ApplicationContext context = new ClassPathXmlApplicationContext("04-2_beanAttribute.xml");
		System.out.println("============= Spring Container 초기화 후 =============");


		//init-method 속성 & destroy-method 속성
		//ApplicationContext.getBean(String beanName) : 스프링 컨테이너에게 Spring Bean을 구분하기 위한
		//식별자(beanId 또는 beanName)를 전달하여 객체(Spring Bean)를 생성하여 반환하는 메소드
		//=> Object 타입의 객체를 반환하므로 반드시 명시적 객체 형변환 사용
		//InitDestroyMethodBean bean = (InitDestroyMethodBean)context.getBean("initDestroyMethodBean");

		//ApplicationContext.getBean(String beanName, Class<T> clazz)  : 스프링 컨테이너에게
		//Spring Bean을 구분하기 위한 식별자(beanName)와 Class 객체(Clazz)를 전달하여 원하는
		//클래스 타입의 객체(Spring Bean)로 변환하여 반환하는 메소드
		InitDestroyMethodBean bean = context.getBean("initDestroyMethodBean", InitDestroyMethodBean.class);

		//bean.init();
		bean.display();
		//bean.destroy();
		System.out.println("======================================================");


		//lazy-init 속성
		context.getBean("lazyInitBean", LazyInitBean.class);
		System.out.println("======================================================");


        //depends-on 속성
		ScopeBean bean1=context.getBean("singletonBean",ScopeBean.class);
		ScopeBean bean2=context.getBean("singletonBean",ScopeBean.class);
		ScopeBean bean3=context.getBean("singletonBean",ScopeBean.class);
		//xml 파일에서 bean 엘리먼트의 scope 속성값을 singleton으로 설정하면 단 하나의 객체만 제공하는데, 기본이 singleton임
		System.out.println("bean1 = "+bean1); //bean1 = xyz.itwill04.bean.ScopeBean@379614be
		System.out.println("bean2 = "+bean2); //bean2 = xyz.itwill04.bean.ScopeBean@379614be
		System.out.println("bean3 = "+bean3); //bean3 = xyz.itwill04.bean.ScopeBean@379614be
		System.out.println("======================================================");

		ScopeBean bean4=context.getBean("prototypeBean",ScopeBean.class);
		ScopeBean bean5=context.getBean("prototypeBean",ScopeBean.class);
		ScopeBean bean6=context.getBean("prototypeBean",ScopeBean.class);
		//xml 파일에서 bean 엘리먼트의 scope 속성값을 prototype으로 설정하면 여러개의 객체가 제공됨
		System.out.println("bean4 = "+bean4); //bean4 = xyz.itwill04.bean.ScopeBean@404bbcbd
		System.out.println("bean5 = "+bean5); //bean5 = xyz.itwill04.bean.ScopeBean@1e81f160
		System.out.println("bean6 = "+bean6); //bean6 = xyz.itwill04.bean.ScopeBean@1acaf3d
		System.out.println("======================================================");


		((ClassPathXmlApplicationContext)context).close();
	}


}
03. 🌈어노테이션을 이용한 Bean 클래스 속성 설정방법🌈

1) 💖Spring Bean Configuration File
[04-3_beanAnnotation.xml]
- 어노테이션을 이용해도 XML파일은 반드시 있어야 함

<?xml version="1.0" encoding="UTF-8"?>
<beans xmlns="<http://www.springframework.org/schema/beans>"
xmlns:xsi="<http://www.w3.org/2001/XMLSchema-instance>"
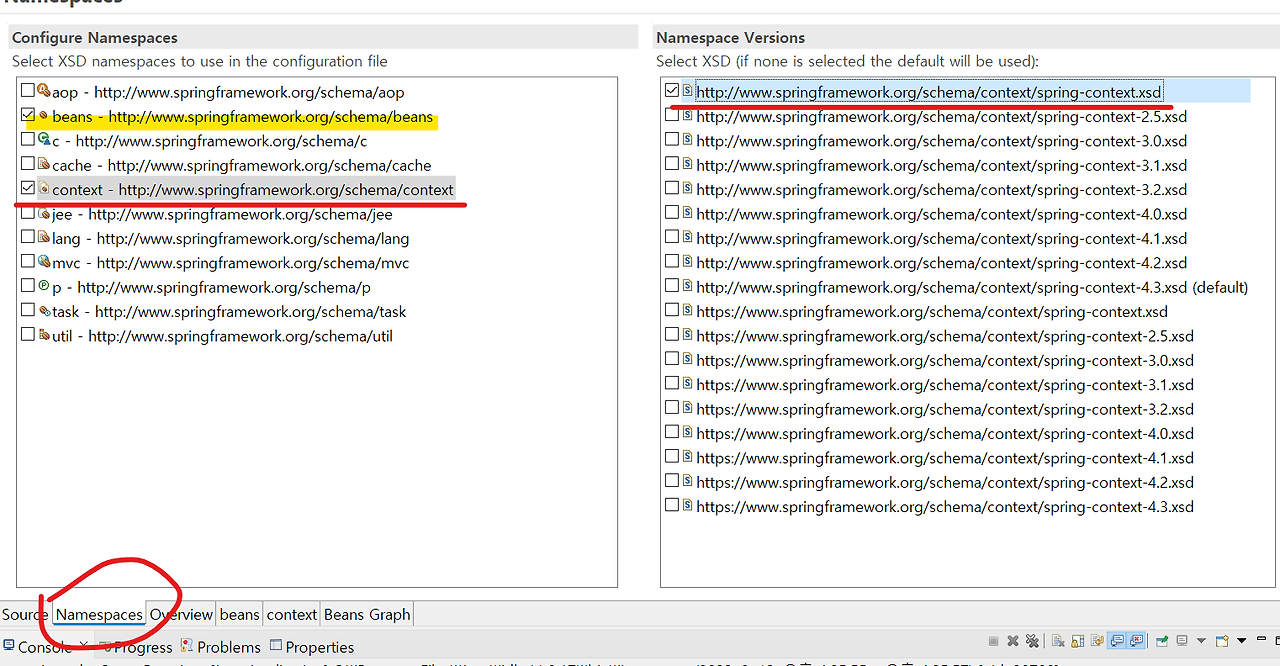
xmlns:context="<http://www.springframework.org/schema/context>"
xsi:schemaLocation="<http://www.springframework.org/schema/beans> <http://www.springframework.org/schema/beans/spring-beans.xsd>
<http://www.springframework.org/schema/context> <http://www.springframework.org/schema/context/spring-context.xsd>">
<!-- 🔥배포받은 클래스는 XML 파일을 이용해 등록하는 것을 권장 -->
<!-- <bean class="xyz.itwill04.bean.AnnotationBean" id="annotationBean"/> -->
<!-- 🔥우리가 만든 클래스는 어노테이션을 이용해 등록하는 것을 권장 -->
<!-- component-scan : 스프링 어노테이션(Spring Annotation)을 스프링 컨테이너가 검색하여 처리할 수 있도록 설정하는 엘리먼트 -->
<!-- => context 네임스페이스의 spring-context.xsd 파일에 의해 제공되는 엘리먼트 -->
<!-- base-package 속성: 스프링 컨테이너가 스프링 어노테이션을 사용한 클래스를 검색하기 위한 패키지를 속성값으로 설정 -->
<context:component-scan base-package="xyz.itwill04.bean"/>
</beans>2) 비권장
- 과거 스프링 프레임워크에서 많이 사용하던 방식, 지금은 잘 사용하지 않음
AnnotationBean.java
package xyz.itwill04.bean;

public class AnnotationBean {
	public AnnotationBean() {
		System.out.println("### AnnotationBean 클래스의 기본 생성자 호출 ###");
	}

	public void display() {
		System.out.println("*** AnnotationBean 클래스의 display() 메소드 호출 ***");
	}
}AnnotationConfigurationBean.java
package xyz.itwill04.bean;

import org.springframework.context.annotation.Bean;
import org.springframework.context.annotation.Configuration;

//@Configuration : 스프링 컨테이너에 의해 관리될 객체(Spring Bean)를 생성하여 반환하는 메소드가 선언될 클래스를 설정하기 위한 어노테이션
//=> 클래스가 Spring Bean Configuration File과 유사한 기능을 제공하는 클래스로 설정하기 위해 사용
//단점 : 객체를 개발자가 직접 만들어야(IoC에 위반) 하므로 사용 잘 안함
//장점 : 자바언어이므로 필드를 이용해 다수의 값들을 저장할 수 있음
@Configuration
public class AnnotationConfigurationBean {
	//@Bean : Spring Bean으로 등록하기 위한 메소드에 설정하는 어노테이션
	//=> @Bean 어노테이션을 사용한 메소드는 클래스를 객체로 생성하여 반환 - Spring Bean
	//=> bean 엘리먼트와 유사한 기능을 제공하는 어노테이션
	//=> 기본적으로 메소드의 이름을 Spring Bean의 식별자(beanName)으로 사용
	//=> @bean 어노테이션의 name 속성을 사용하여 식별자 변경 가능
	@Bean
	public AnnotationBean annotationBean() {
		return new AnnotationBean();
	}
}AnnotationBeanApp.java

package xyz.itwill04.bean;

import org.springframework.context.ApplicationContext;
import org.springframework.context.support.ClassPathXmlApplicationContext;

public class AnnotationBeanApp {
	public static void main(String[] args) {
		System.out.println("============= Spring Container 초기화 전 =============");
		ApplicationContext context = new ClassPathXmlApplicationContext("04-3_beanAnnotation.xml");
		System.out.println("============= Spring Container 초기화 후 =============");
		AnnotationBean bean = context.getBean("annotationBean",AnnotationBean.class);
		bean.display();
		System.out.println("======================================================");
		((ClassPathXmlApplicationContext)context).close();
	}
}
3) 권장
- Spring Bean으로 등록하기 위한 메소드에 설정하는 어노테이션과 메소드를 개발자가 직접 만들지 않아도 됨!
- (위에 코드와 비교해보기)
ComponentAnnotationBean.java
package xyz.itwill04.bean;

import org.springframework.stereotype.Component;

//@Component : 클래스를 스프링 컨테이너가 관리하는 Spring Bean으로 등록하는 어노테이션
//=> 기본적으로 클래스의 이름을 Spring Bean의 식별자(beanName)으로 사용 - 첫번째 문자는 소문자로 변환 (자동으로 카멜표기법으로 변경됨)
//=> @Component 어노테이션의 value 속성을 사용하여 식별자 변경 가능
//=> @Component 어노테이션에 value 속성 외 다른 속성이 없는 경우 속성값만 설정 가능
@Component("bean")
public class ComponentAnnotationBean {
	public ComponentAnnotationBean() {
		System.out.println("### ComponentAnnotationBean 클래스의 기본 생성자 호출 ###");
	}

	public void display() {
		System.out.println("*** ComponentAnnotationBean 클래스의 display() 메소드 호출 ***");
	}
}
ComponentAnnotationBeanApp.java

package xyz.itwill04.bean;

import org.springframework.context.ApplicationContext;
import org.springframework.context.support.ClassPathXmlApplicationContext;

public class ComponentAnnotationBeanApp {
	public static void main(String[] args) {
		System.out.println("============= Spring Container 초기화 전 =============");
		ApplicationContext context = new ClassPathXmlApplicationContext("04-3_beanAnnotation.xml");
		System.out.println("============= Spring Container 초기화 후 =============");
		ComponentAnnotationBean bean = context.getBean("bean",ComponentAnnotationBean.class);
		bean.display();
		System.out.println("======================================================");
		((ClassPathXmlApplicationContext)context).close();
	}
}
반응형
'framework > spring IOC(제어의 역행)' 카테고리의 다른 글
| [springIOC] 6. DI | 자동주입 | 자동으로 Inject 하는 법 (0) | 2024.07.28 |
|---|---|
| [springIOC] 5. DI | 수동주입 | Constructor Injection & Setter Injection (0) | 2024.07.28 |
| [springIOC] 4. DI | 수동주입 | 집합객체로 의존성 주입해 객체 생성하는법 (0) | 2024.07.27 |
| [springIOC] 2. 결합도가 매우 낮은 프로그램 - 스프링 컨테이너의 역할 및 장점, 스프링빈 (0) | 2024.07.26 |
| [springIOC] 1. 결합도가 높은 프로그램 vs 결합도가 낮은 프로그램(팩토리클래스의 역할) (0) | 2024.07.26 |
반응형
01. 스프링 Bean 클래스 생성법
- 🍭BeanFactory 객체를 생성하여 스프링 컨테이너로 사용
- 🍡ApplicationContext 객체를 생성하여 스프링 컨테이너로 사용 - 권장
1) ApplicationContext 객체 사용의 장점
- xml 파일을 읽는 것이 쉬움
- 미리 객체를 만들어주기 때문에 빠르게 접근해 객체 사용할 수 있음
- 스프링을 초기화 처리할 수 있는 다양한 메소드들이 매우 많음
- ApplicationContext 객체를 제거하는 메소드도 사용 가능 - 객체는 미리 만들어지지만 사용 안하면 지울 수 있으므로 메모리 관리 효율적
- 나중에 Spring MVC 만들 때 WebApplicationContext객체 (ApplicationContext객체의 자식)을 이용해 만듦
- 또한 BeanFactory 객체는 Inject기능도 많이 없음
2) 일종의 DAO클래스
src.main.java > xyz.itwill04.bean > CreateBean.java
package xyz.itwill04.bean;

public class CreateBean {

	public CreateBean() {
		System.out.println("### CreateBean 클래스의 기본 생성자 호출 ###");
	}

	public void display() {
		System.out.println("*** CreateBean 클래스의 display() 메소드 호출 ***");
	}

}
3) 💖Spring Bean Configuration File
[src.main.resources > 04-1_beanCreate.xml] : 스프링 컨테이너로부터 스프링 빈을 등록하여 사용함
<?xml version="1.0" encoding="UTF-8"?>
<beans xmlns="<http://www.springframework.org/schema/beans>"
	xmlns:xsi="<http://www.w3.org/2001/XMLSchema-instance>"
	xsi:schemaLocation="<http://www.springframework.org/schema/beans> <http://www.springframework.org/schema/beans/spring-beans.xsd>">
	<!-- Spring Bean Configuration File을 여러개 작성하여 사용하는 이유 -->
	<!-- => 하나의 Spring Bean Configuration File을 사용하여 Spring Bean을 설정할 경우 가독성 및 유지보수의 비효율성 증가 -->

	<!-- import 엘리먼트 -->
	<!-- import : 다른 Spring Bean Configuration File의 Spring Bean 정보를 제공받아 포함하는 엘리먼트 -->
	<!-- resource속성: 포함될 Spring Bean Configuration File의 경로를 속성값으로 설정 -->
	<!-- <import resource="03_message.xml"/>  -->


	<!-- bean 엘리먼트 -->
	<!-- bean : 스프링 컨테이너에게 Spring Bean 관련 정보를 제공하기 위한 엘리먼트 -->
	<!-- => Spring Bean : 스프링 컨테이너에 의해 관리(생성, 사용, 소멸)되는 객체(클래스) -->
	<!-- class 속성: Spring Bean으로 등록되어 사용될 클래스를 속성값으로 설정 - 필수 -->
	<!-- => class 속성값은 이클립스의 자동완성 기능을 사용하여 작성 가능 -->
	<!-- id 속성:  Spring Bean을 구분하기 위한 식별자를 속성값으로 설정 -->
	<!-- => id 속성대신 name 속성을 사용하여 식별자(BeanId 또는 BeanName) 설정 가능 -->
	<!-- => id 속성값은 클래스 이름(부모 인터페이스 이름)을 이용하여 설정하는 것을 권장 -->
	<!-- => id 속성값은 class 속성이 설정되어 있는 경우 이클립스의 자동완성 기능을 사용하여 작성 가능 -->
	<bean class="xyz.itwill04.bean.CreateBean" id="createBean"/>

</beans>
4) 일종의 요청처리
src.main.java > xyz.itwill04.bean > CreateBeanApp.java
package xyz.itwill04.bean;

import org.springframework.beans.factory.BeanFactory;
import org.springframework.beans.factory.xml.XmlBeanFactory;
import org.springframework.context.ApplicationContext;
import org.springframework.context.support.ClassPathXmlApplicationContext;
import org.springframework.core.io.FileSystemResource;

//Spring Framework에서는 BeanFactory객체(과거에많이사용) 또는 ApplicationContext객체(현재많이사용)로 스프링 컨테이너(Spring Container)기능 제공
//=> 스프링 컨테이너는 환경설정파일(Spring Bean Configuration File - XML)을 제공받아 클래스의 객체(Spring Bean)를 관리
public class CreateBeanApp {
	public static void main(String[] args) {

		//1.
		//🍭BeanFactory객체를 생성하여 스프링 컨테이너로 사용
		System.out.println("1.BeanFactory 객체를 생성하여 스프링 컨테이너로 사용");
		System.out.println("============= Spring Container 초기화 전 ============="); //XML 파일 읽어들이기 전이다..!

		//BeanFatory 인터페이스를 상속받은 클래스로 객체를 생성 - BeanFactory 객체
		//=> BeanFactory 객체를 생성할 때 Spring Bean Configuration File를 제공받아 스프링 컨테이너 생성 - 스프링 컨테이너 초기화 작업
		//=> Spring Bean Configuration File의 파일 경로를 모두 표현하여 설정 - 단점) 배포 시 경로설정이 변경되므로 불편

		//=> BeanFactory 객체는 Spring Bean Configuration File에 등록된 클래스로 미리 객체를 생성하지 않고 Spring Bean 요청 시 객체를 생성하여 제공
    	//=> FileSystemResource 객체를 이용해 파일 경로를 쉽게 표현함
    	@SuppressWarnings("deprecation")
		BeanFactory factory = new XmlBeanFactory(new FileSystemResource("src/main/resources/04-1_beanCreate.xml"));
		System.out.println("============= Spring Container 초기화 후 ============="); //XML 파일을 읽어들였다..!

		//BeanFactory.getBean(String beanName) : 스프링 컨테이너에게 Spring Bean을 구분하기 위한 식별자(beanId 또는 beanName)를 전달하여 객체(Spring Bean)를 생성하여 반환하는 메소드
		//=> Object 타입의 객체를 반환하므로 반드시 명시적 객체 형변환 사용
		//=> 전달받은 식별자(beanName)에 대한 Spring Bean이 없는 경우 NoSuchBeanDefinitionException 예외 발생 - null을 주지는 않음
		CreateBean bean1 = (CreateBean)factory.getBean("createBean");
		bean1.display();

		//따로 객체 소멸 메소드 작성 안해도 됨
		System.out.println("======================================================");
//2.
//🍡ApplicationContext객체를 생성하여 스프링 컨테이너로 사용
System.out.println("2. ApplicationContext 객체를 생성하여 스프링 컨테이너로 사용");
System.out.println("============= Spring Container 초기화 전 ============="); //XML 파일 읽어들이기 전이다..!
//ApplicationContext 인터페이스를 상속받은 클래스로 객체를 생성 - ApplicationContext 객체
//=> ApplicationContext 객체를 생성할 때 Spring Bean Configuration File를 제공받아 스프링 컨테이너 생성 - 스프링 컨테이너 초기화 작업
//=> 클래스가 참조 가능한 디렉토리(ClassPath)에 있는 Spring Bean Configuration File을 표현하여 설정
//=> ApplicationContext 객체는 Spring Bean Configuration File에 등록된 클래스로 미리 객체를 생성하여 Spring Bean 요청 시 제공
//=> 현재로써 사용하기 가장 편한 객체인 ClassPathXmlApplicationContext로 이용해 만듦
ApplicationContext context = new ClassPathXmlApplicationContext("04-1_beanCreate.xml");
System.out.println("============= Spring Container 초기화 후 ============="); //XML 파일을 읽어들였다..!
//DL(Dependecy Lookup) : 스프링 컨테이너로부터 필요한 Spring Bean을 검색하여 제공하는 기능
//ApplicationContext.getBean(String beanName) : 스프링 컨테이너에게 Spring Bean을 구분하기 위한 식별자(beanId 또는 beanName)를 전달하여 객체(Spring Bean)를 생성하여 반환하는 메소드
//=> Object 타입의 객체를 반환하므로 반드시 명시적 객체 형변환 사용
CreateBean bean2 = (CreateBean)factory.getBean("createBean");
bean2.display();
//ClassPathXmlApplicationContext.close() : ApplicationContext 객체를 제거하는 메소드
//=> 스프링 컨테이너에 의해 관리되는 모든 객체(Spring Bean) 자동 소멸
((ClassPathXmlApplicationContext)context).close(); //해도 되고 안해도 됨- 나중에 자동으로 소멸되니..
System.out.println("======================================================");
}
}
02. 🌈스프링 Bean 클래스 속성 설정방법🌈
1) Bean 클래스 등록 시 사용 가능한 속성들
2) 일종의 DAO클래스
🖤destroy-method 속성 이용하기 위한 클래스 - InitDestroyMethodBean.java
package xyz.itwill04.bean;

public class InitDestroyMethodBean /*implements BeanNameAware*/ {

	public InitDestroyMethodBean() {
		System.out.println("### InitDestroyMethodBean 클래스의 기본 생성자 호출 ###");
	}

	//객체 생성 후 객체의 초기화 작업(필드의 초기값 설정)을 위해 한번만 자동 호출되는 메소드
	public void init() {
		System.out.println("*** CreateBean 클래스의 init() 메소드 호출 ***");
	}

	//객체 소멸 전 객체의 마무리 작업을 위해 한번만 자동 호출되는 메소드
	public void destroy() {
		System.out.println("*** CreateBean 클래스의 destroy() 메소드 호출 ***");
	}

	public void display() {
		System.out.println("*** CreateBean 클래스의 display() 메소드 호출 ***");
	}

	/*
	//클래스명 변경하고 싶을 때 BeanNameAware 인터페이스를 상속받아 아래처럼 오버라이드 작성
	//이 외 Aware 인터페이스는 매우 많음 -> 생성되는 객체의 초기화작업을 쉽게 도와줌, 잘 사용은 안함
	private String beanName;

	@Override
	public void setBeanName(String name) {
		this.beanName= beanName;
	}
	*/

}
🖤lazy-init 속성 이용하기 위한 클래스 - LazyInitBean.java
package xyz.itwill04.bean;

public class LazyInitBean {
	public LazyInitBean() {
		System.out.println("### LazyInitBean 클래스의 기본 생성자 호출 ###");
	}
}
🖤factory-method 속성 이용하기 위한 클래스 - FactoryMethodBean.java
package xyz.itwill04.bean;

//싱글톤 디자인 패턴을 적용하여 작성된 클래스 - 싱글톤 클래스(Singleton Class)
// => 프로그램에 필요한 객체를 하나만 제공하기 위한 목적의 클래스 작성 시 사용하는 디자인 패턴
public class FactoryMethodBean {
	private static FactoryMethodBean _bean;

	private FactoryMethodBean() {
		System.out.println("### FactoryMethodBean 클래스의 기본 생성자 호출 ###");
	}

	static {
		_bean = new FactoryMethodBean();
	}

	public static FactoryMethodBean getFactoryMethodBean() {
		System.out.println("*** FactoryMethodBean 클래스의 getFactoryMethodBean() 메소드 호출 ***");
		return _bean;
	}
}
🖤depends-on 속성 이용하기 위한 클래스 - DependsOnOneBean.java & DependsOnTwoBean.java
package xyz.itwill04.bean;

public class DependsOnOneBean {
	public DependsOnOneBean() {
		System.out.println("### DependsOnOneBean 클래스의 기본 생성자 호출 ###");
	}
}
package xyz.itwill04.bean;

public class DependsOnTwoBean {
	public DependsOnTwoBean() {
		System.out.println("### DependsOnTwoBean 클래스의 기본 생성자 호출 ###");
	}
}
🖤scope 속성 이용하기 위한 클래스 - ScopeBean.java
package xyz.itwill04.bean;

public class ScopeBean {
	public ScopeBean() {
		System.out.println("### ScopeBean 클래스의 기본 생성자 호출 ###");
	}
}
3) 💖Spring Bean Configuration File
[04-2_beanAttribute.xml]
<?xml version="1.0" encoding="UTF-8"?>
<beans xmlns="<http://www.springframework.org/schema/beans>"
	xmlns:xsi="<http://www.w3.org/2001/XMLSchema-instance>"
	xsi:schemaLocation="<http://www.springframework.org/schema/beans> <http://www.springframework.org/schema/beans/spring-beans.xsd>">
init-method 속성
	<!-- init-method 속성 : 스프링 컨테이너에 의해 객체(Spring Bean)가 생성된 후 한번만 자동
	호출되어 생성 객체의 초기화 작업을 실행하기 위한 메소드의 이름을 속성값으로 설정 -->
	<!-- => init-method 속성값은 이클립스이 자동완성 기능을 사용하여 작성 가능 -->
	<!-- destroy-method 속성 : 스프링 컨테이너에 의해 객체(Spring Bean)가 소멸되기 전 한번만 자동
	호출되어 생성 객체의 마무리 작업을 실행하기 위한 메소드의 이름을 속성값으로 설정 -->
	<!-- => destroy-method 속성값은 이클립스이 자동완성 기능을 사용하여 작성 가능 -->
	<bean class="xyz.itwill04.bean.InitDestroyMethodBean" id="initDestroyMethodBean"
		init-method="init" destroy-method="destroy"/>
lazy-init 속성
	<!-- lazy-init 속성 : false 또는 true 중 하나를 속성값으로 설정 -->
	<!-- => false(기본) : 스프링 컨테이너를 초기화할 때 객체(Spring Bean)를 미리 생성함-->
	<!-- => true : 스프링 컨테이너로부터 객체(Spring Bean)를 제공받기 위해 getBean() 메소드를 호출할 때 생성함-->
	<bean class="xyz.itwill04.bean.LazyInitBean" id="lazyInitBean" lazy-init="true"/>
factory-method 속성 : 다른 사람이 만든 것을 가져다 쓸 때 싱글톤으로 제공받아야 한다면 factory-method 속성 이용함 - 거의 사용할 일은 없긴함
	<!-- 스프링 컨테이너는 Spring Bean Configuration File에 등록된 모든 클래스를
    리플렉션 기술을 사용하여 미리 객체(Spring Bean)로 생성 -->
	<!-- => 리플렉션 기술을 사용하면 클래스의 접근 지정자에 상관없이 모든 요소에 접근 가능  -->
	<!-- => 생성자가 은닉화 선언되어 있어도 스프링 컨테이너는 클래스의 생성자로 객체
	생성 가능 -->
	<!-- Spring Bean Configuration File에 등록된 싱글톤 클래스는 클래스가 메모리에
 	로딩된 후 정적영역의 명령을 실행하여 객체를 생성하고 스프링 컨테이너에 의해 객체를
	다시 생성함 - 객체가 2개 만들어짐 -->
	<!-- => 싱글톤 클래스에 의해 객체가 2개 생성 - 싱글톤 클래스의 작성 규칙 위반 -->

	<!-- factory-method 속성 : 싱글톤 클래스에서 객체를 반환하는 메소드의 이름을
	속성값으로 설정 -->
	<!-- => 스프링 컨테이너에 의해 객체를 생성하지 않고 정적영역의 명령으로 객체를 생성하여
 	사용 -->
	<bean class="xyz.itwill04.bean.FactoryMethodBean" factory-method="getFactoryMethodBean"/>
depends-on 속성
	<!-- 스프링 컨테이너는 bean 엘리먼트의 선언 순서대로 등록된 클래스를 객체로 생성 -->
	<!-- depends-on 속성 : Spring Bean을 구분하기 위한 식별자(beanName)를 속성값으로 설정 -->
	<!-- => bean 엘리먼트에 등록된 클래스를 객체로 생성하기 전에 속성값으로 설정된
	Spring Bean의 클래스를 객체로 미리 생성 -->
	<bean class="xyz.itwill04.bean.DependsOnOneBean" depends-on="dependsOnTwoBean"/>
	<bean class="xyz.itwill04.bean.DependsOnTwoBean" id="dependsOnTwoBean"/>
scope 속성
	<!-- scope 속성 : singleton(기본), prototype, request, session 중 하나를 속성값으로 설정 -->
	<!-- singleton 또는 prototype : 객체(spring Bean)의 생성 갯수를 설정하는 속성값 -->
	<!-- singleton : 스프링 컨테이너가 bean 엘리먼트에 등록된 클래스로 객체를 하나만 생성하여 제공 -->
	<!-- prototype : 스프링 컨테이너가 bean 엘리먼트에 등록된 클래스로 객체를 여러개 생성하여 제공 -->
	<!-- => scope 속성값을 [prototype]으로 설정할 경우 lazy-init 속성값을 반드시 [true]로 설정 -->
	<!--  request 또는 session : 객체(spring Bean)의 사용 범위를 설정하는 속성값 - 웹프로그램 작성 시에만 사용 -->
	<bean class="xyz.itwill04.bean.ScopeBean" id="singletonBean" lazy-init="true" scope="singleton"/>
	<bean class="xyz.itwill04.bean.ScopeBean" id="prototypeBean" lazy-init="true" scope="prototype"/>
</beans>
4) 일종의 요청처리
BeanAttributeApp.java
package xyz.itwill04.bean;

import org.springframework.context.ApplicationContext;
import org.springframework.context.support.ClassPathXmlApplicationContext;

public class BeanAttributeApp {
	public static void main(String[] args) {
		System.out.println("============= Spring Container 초기화 전 =============");
		ApplicationContext context = new ClassPathXmlApplicationContext("04-2_beanAttribute.xml");
		System.out.println("============= Spring Container 초기화 후 =============");


		//init-method 속성 & destroy-method 속성
		//ApplicationContext.getBean(String beanName) : 스프링 컨테이너에게 Spring Bean을 구분하기 위한
		//식별자(beanId 또는 beanName)를 전달하여 객체(Spring Bean)를 생성하여 반환하는 메소드
		//=> Object 타입의 객체를 반환하므로 반드시 명시적 객체 형변환 사용
		//InitDestroyMethodBean bean = (InitDestroyMethodBean)context.getBean("initDestroyMethodBean");

		//ApplicationContext.getBean(String beanName, Class<T> clazz)  : 스프링 컨테이너에게
		//Spring Bean을 구분하기 위한 식별자(beanName)와 Class 객체(Clazz)를 전달하여 원하는
		//클래스 타입의 객체(Spring Bean)로 변환하여 반환하는 메소드
		InitDestroyMethodBean bean = context.getBean("initDestroyMethodBean", InitDestroyMethodBean.class);

		//bean.init();
		bean.display();
		//bean.destroy();
		System.out.println("======================================================");


		//lazy-init 속성
		context.getBean("lazyInitBean", LazyInitBean.class);
		System.out.println("======================================================");


        //depends-on 속성
		ScopeBean bean1=context.getBean("singletonBean",ScopeBean.class);
		ScopeBean bean2=context.getBean("singletonBean",ScopeBean.class);
		ScopeBean bean3=context.getBean("singletonBean",ScopeBean.class);
		//xml 파일에서 bean 엘리먼트의 scope 속성값을 singleton으로 설정하면 단 하나의 객체만 제공하는데, 기본이 singleton임
		System.out.println("bean1 = "+bean1); //bean1 = xyz.itwill04.bean.ScopeBean@379614be
		System.out.println("bean2 = "+bean2); //bean2 = xyz.itwill04.bean.ScopeBean@379614be
		System.out.println("bean3 = "+bean3); //bean3 = xyz.itwill04.bean.ScopeBean@379614be
		System.out.println("======================================================");

		ScopeBean bean4=context.getBean("prototypeBean",ScopeBean.class);
		ScopeBean bean5=context.getBean("prototypeBean",ScopeBean.class);
		ScopeBean bean6=context.getBean("prototypeBean",ScopeBean.class);
		//xml 파일에서 bean 엘리먼트의 scope 속성값을 prototype으로 설정하면 여러개의 객체가 제공됨
		System.out.println("bean4 = "+bean4); //bean4 = xyz.itwill04.bean.ScopeBean@404bbcbd
		System.out.println("bean5 = "+bean5); //bean5 = xyz.itwill04.bean.ScopeBean@1e81f160
		System.out.println("bean6 = "+bean6); //bean6 = xyz.itwill04.bean.ScopeBean@1acaf3d
		System.out.println("======================================================");


		((ClassPathXmlApplicationContext)context).close();
	}


}
03. 🌈어노테이션을 이용한 Bean 클래스 속성 설정방법🌈
1) 💖Spring Bean Configuration File
[04-3_beanAnnotation.xml]
- 어노테이션을 이용해도 XML파일은 반드시 있어야 함
<?xml version="1.0" encoding="UTF-8"?>
<beans xmlns="<http://www.springframework.org/schema/beans>"
	xmlns:xsi="<http://www.w3.org/2001/XMLSchema-instance>"
	xmlns:context="<http://www.springframework.org/schema/context>"
	xsi:schemaLocation="<http://www.springframework.org/schema/beans> <http://www.springframework.org/schema/beans/spring-beans.xsd>
		<http://www.springframework.org/schema/context> <http://www.springframework.org/schema/context/spring-context.xsd>">

	<!-- 🔥배포받은 클래스는 XML 파일을 이용해 등록하는 것을 권장 -->
	<!-- <bean class="xyz.itwill04.bean.AnnotationBean" id="annotationBean"/>  -->

  	<!-- 🔥우리가 만든 클래스는 어노테이션을 이용해 등록하는 것을 권장 -->
	<!-- component-scan : 스프링 어노테이션(Spring Annotation)을 스프링 컨테이너가 검색하여 처리할 수 있도록 설정하는 엘리먼트 -->
	<!-- => context 네임스페이스의 spring-context.xsd 파일에 의해 제공되는 엘리먼트 -->
	<!-- base-package 속성: 스프링 컨테이너가 스프링 어노테이션을 사용한 클래스를 검색하기 위한 패키지를 속성값으로 설정 -->
	<context:component-scan base-package="xyz.itwill04.bean"/>
</beans>
2) 비권장
- 과거 스프링 프레임워크에서 많이 사용하던 방식, 지금은 잘 사용하지 않음
AnnotationBean.java
package xyz.itwill04.bean;

public class AnnotationBean {
	public AnnotationBean() {
		System.out.println("### AnnotationBean 클래스의 기본 생성자 호출 ###");
	}

	public void display() {
		System.out.println("*** AnnotationBean 클래스의 display() 메소드 호출 ***");
	}
}
AnnotationConfigurationBean.java
package xyz.itwill04.bean;

import org.springframework.context.annotation.Bean;
import org.springframework.context.annotation.Configuration;

//@Configuration : 스프링 컨테이너에 의해 관리될 객체(Spring Bean)를 생성하여 반환하는 메소드가 선언될 클래스를 설정하기 위한 어노테이션
//=> 클래스가 Spring Bean Configuration File과 유사한 기능을 제공하는 클래스로 설정하기 위해 사용
//단점 : 객체를 개발자가 직접 만들어야(IoC에 위반) 하므로 사용 잘 안함
//장점 : 자바언어이므로 필드를 이용해 다수의 값들을 저장할 수 있음
@Configuration
public class AnnotationConfigurationBean {
	//@Bean : Spring Bean으로 등록하기 위한 메소드에 설정하는 어노테이션
	//=> @Bean 어노테이션을 사용한 메소드는 클래스를 객체로 생성하여 반환 - Spring Bean
	//=> bean 엘리먼트와 유사한 기능을 제공하는 어노테이션
	//=> 기본적으로 메소드의 이름을 Spring Bean의 식별자(beanName)으로 사용
	//=> @bean 어노테이션의 name 속성을 사용하여 식별자 변경 가능
	@Bean
	public AnnotationBean annotationBean() {
		return new AnnotationBean();
	}
}
AnnotationBeanApp.java
package xyz.itwill04.bean;

import org.springframework.context.ApplicationContext;
import org.springframework.context.support.ClassPathXmlApplicationContext;

public class AnnotationBeanApp {
	public static void main(String[] args) {
		System.out.println("============= Spring Container 초기화 전 =============");
		ApplicationContext context = new ClassPathXmlApplicationContext("04-3_beanAnnotation.xml");
		System.out.println("============= Spring Container 초기화 후 =============");
		AnnotationBean bean = context.getBean("annotationBean",AnnotationBean.class);
		bean.display();
		System.out.println("======================================================");
		((ClassPathXmlApplicationContext)context).close();
	}
}
3) 권장
- Spring Bean으로 등록하기 위한 메소드에 설정하는 어노테이션과 메소드를 개발자가 직접 만들지 않아도 됨!
- (위에 코드와 비교해보기)
ComponentAnnotationBean.java
package xyz.itwill04.bean;

import org.springframework.stereotype.Component;

//@Component : 클래스를 스프링 컨테이너가 관리하는 Spring Bean으로 등록하는 어노테이션
//=> 기본적으로 클래스의 이름을 Spring Bean의 식별자(beanName)으로 사용 - 첫번째 문자는 소문자로 변환 (자동으로 카멜표기법으로 변경됨)
//=> @Component 어노테이션의 value 속성을 사용하여 식별자 변경 가능
//=> @Component 어노테이션에 value 속성 외 다른 속성이 없는 경우 속성값만 설정 가능
@Component("bean")
public class ComponentAnnotationBean {
	public ComponentAnnotationBean() {
		System.out.println("### ComponentAnnotationBean 클래스의 기본 생성자 호출 ###");
	}

	public void display() {
		System.out.println("*** ComponentAnnotationBean 클래스의 display() 메소드 호출 ***");
	}
}
ComponentAnnotationBeanApp.java
package xyz.itwill04.bean;

import org.springframework.context.ApplicationContext;
import org.springframework.context.support.ClassPathXmlApplicationContext;

public class ComponentAnnotationBeanApp {
	public static void main(String[] args) {
		System.out.println("============= Spring Container 초기화 전 =============");
		ApplicationContext context = new ClassPathXmlApplicationContext("04-3_beanAnnotation.xml");
		System.out.println("============= Spring Container 초기화 후 =============");
		ComponentAnnotationBean bean = context.getBean("bean",ComponentAnnotationBean.class);
		bean.display();
		System.out.println("======================================================");
		((ClassPathXmlApplicationContext)context).close();
	}
}
반응형
'framework > spring IOC(제어의 역행)' 카테고리의 다른 글
| [springIOC] 6. DI | 자동주입 | 자동으로 Inject 하는 법 (0) | 2024.07.28 |
|---|---|
| [springIOC] 5. DI | 수동주입 | Constructor Injection & Setter Injection (0) | 2024.07.28 |
| [springIOC] 4. DI | 수동주입 | 집합객체로 의존성 주입해 객체 생성하는법 (0) | 2024.07.27 |
| [springIOC] 2. 결합도가 매우 낮은 프로그램 - 스프링 컨테이너의 역할 및 장점, 스프링빈 (0) | 2024.07.26 |
| [springIOC] 1. 결합도가 높은 프로그램 vs 결합도가 낮은 프로그램(팩토리클래스의 역할) (0) | 2024.07.26 |
