목차
반응형
01. swing 프로그램 작성법
SwingApp.java
package xyz.itwill.swing;

import java.awt.BorderLayout;
import java.awt.Container;
import java.awt.Font;
import java.awt.event.ActionEvent;
import java.awt.event.ActionListener;

import javax.swing.JFrame;
import javax.swing.JScrollPane;
import javax.swing.JTextArea;
import javax.swing.JTextField;

//📦Swing 프로그램을 작성하는 방법

//📌Swing 프로그램을 작성하는 방법 - (java.awt와 다른점)
// => 🌈 1. java.awt 패키지의 컴퍼넌트 또는 컨테이너 관련 클래스 대신 javax.swing 패키지의 컴퍼넌트 또는 컨테이너 관련 클래스를 사용하여 UI 구현
// => AWT 컴퍼넌트 또는 컨테이너 클래스 이름 앞의 J를 붙이면 Swing 컴퍼넌트 또는 컨테이너 클래스가 된다.
// => javax.swing패키지는 많은 컴포넌트와 컨테이너 존재
// =>  더 다양한 모양의 UI 구현 가능

// => 🐣 2. 프레임의 [닫기버튼]를 누른 경우 동작되는 기능을 변경하여 프레임 조작 가능
// => 간편닫기기능
//형식) JFrame.setDefaultCloseOperation(int operation);
// => operation 매개변수에는 DO_NOTHING_ON_CLOSE, HIDE_ON_CLOSE(기본), DISPOSE_ON_CLOSE, EXIT_ON_CLOSE 중 하나의 상수를 사용하여 프레임의 조작 방법 설정

// => 3.프레임을 직접 변경하지 않고 프레임의 Container 객체를 반환받아 변경 처리
// => Container container = getContentPane();
// => 프레임의 배치관리자 변경, 프레임의 컴퍼넌트 부착, 프레임의 배경색 변경 등

// => 📌그 외 나머지는 java.awt패키지와 동일하다.

//🌈디자인클래스
public class SwingApp extends JFrame{

	//필드
	private static final long serialVersionUID = 1L;

	// => JTextField 컴포넌트에서 문자열 입력 후 엔터를 치면 ActionEvent 발생
	JTextField textField; //TextField클래스 대신 JTextField클래스
	JTextArea textArea;  //TextArea클래스 대신 JTextArea클래스

  	//생성자
	public SwingApp(String title) {
		super(title);

		//1.
    	//JTextField와 JTextArea생성
		textField = new JTextField();
		textArea = new JTextArea("[홍길동]님이 입장하였습니다.\\\\n");

    	//2.⭐
    	//스크롤 생성을 위한 컨테이너 생성 -> awt패키지는 자동스크롤이라 생성필요없었는데ㅠ
		// => JScrollPane : 컴포넌트가 범위를 벗어날 경우 스크롤을 생성하기 위한 컨테이너
		JScrollPane jScrollPane = new JScrollPane(textArea);

    	//3-1.⭐
    	//Frame객체를 변경하기 위해 프레임의 Container 객체 반환받음
		// => JFrame.getContentPane() : 프레임의 컨테이너 기능을 제공하는 Container 객체를 반환하는 메소드
		Container container = getContentPane();

		//3-2.⭐
    	//프레임의 레이아웃설정
		container.add(jScrollPane, BorderLayout.CENTER);
		container.add(textField, BorderLayout.SOUTH);

    	//4.
    	//JTextField와 JTextArea 꾸미기 - Swing 프로그램에서는 모든 글꼴 사용 가능
		textField.setFont(new Font("굴림체", Font.BOLD, 20));
		textArea.setFont(new Font("굴림체", Font.BOLD, 20));
		textArea.setFocusable(false); //출력컴포넌트
		//textArea.setFocusable(true); //입력컴포넌트

    	//5.⭐
		// 프레임의 [닫기버튼]시 기능 변경
		setDefaultCloseOperation(EXIT_ON_CLOSE);

    	//6.
    	//🐣이벤트발생 시 이벤트객체 생성!!!!!
    	//=>해석) textField에서 Action이벤트가 발생하면 TextEventHandle객체가 처리해줄거에요
		textField.addActionListener(new TextEventHandle());

		//7.
		setBounds(800,200,400,500);
		setVisible(true);
	}

	//main메소드
	public static void main(String[] args) {
		new SwingApp("Swing");
	}

	//🍀이벤트처리클래스
	public class TextEventHandle implements ActionListener{
		@Override
		public void actionPerformed(ActionEvent e) {
			//TextComponent.getText() :  JTextField 컴퍼넌트 또는 JTextArea 컴퍼넌트에 입력된 문자열을 얻어와 반환하는 메소드
			String text = textField.getText();

			if(!text.equals("")) { //입력된 문자열이 있는 경우(만약 text가 nullString이 아니라면)
				//JTextArea.append(String text) : JTextArea 컴퍼넌트에 문자열을 추가하여 출력하는 메소드
				textArea.append("[홍길동]" + text + "\\\\n");

				//TextComponent.setText(String text) : JTextField 컴퍼넌트 또는 JTextArea 컴퍼넌트에 입력된 문자열을 변경하는 메소드
				textField.setText(""); //초기화처리 (textField에 아무것도 없게 해주세요)
			}
		}

	}

}
02. windowbuilder 사용 (자바 Plug-In)
1. 📦 windowbuilder 설치법하기
📦Plug-In이란?
- 확장프로그램
📦windowbuilder 확장프로그램(플러그인)이란?
- javax.swing패키지 프로그램을 만들어낼 수 있는 디자인 도구
- javax.swing패키지로 개발할 때 좀 더 쉽게 개발을 도와줌
📦Plug-In 설치방법 (with 이클립스)
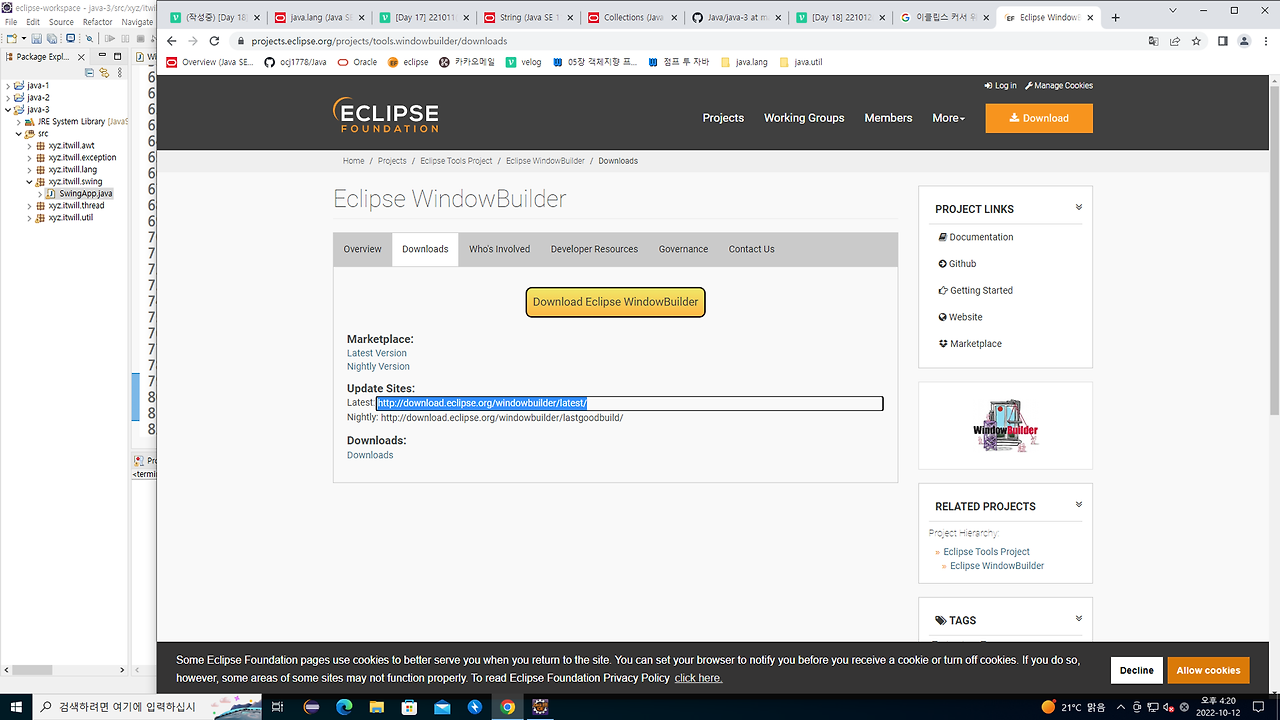
- 이클립스 사이트 내
- projects클릭 >> windowbuilder검색 >> url복사 >> 이클립스의 help버튼클릭 >> install new software >> work with에 url 주소 복사 후 엔터 >> 설치할 수 있는 프로그램 목록들 나옴, window builder 선택 >> 다 선택해도 되고, 동의 후 설치 >> 재실행
- 이클립스 프로그램 내
- 이클립스의 help버튼클릭 >> marketpalce클릭 >> 검색 >> 설치
📦Plug-In 사용방법 (with 이클립스)
- 마우스왼쪽클릭 >> openwith >> widow builder editor
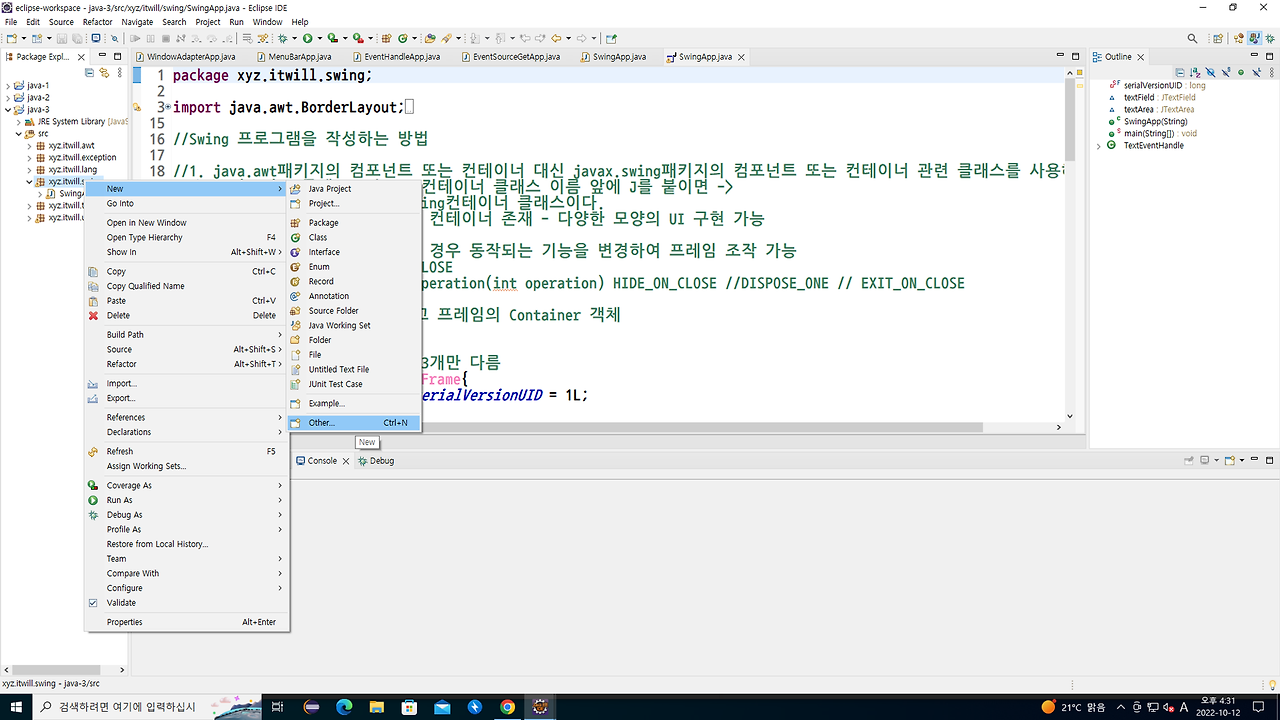
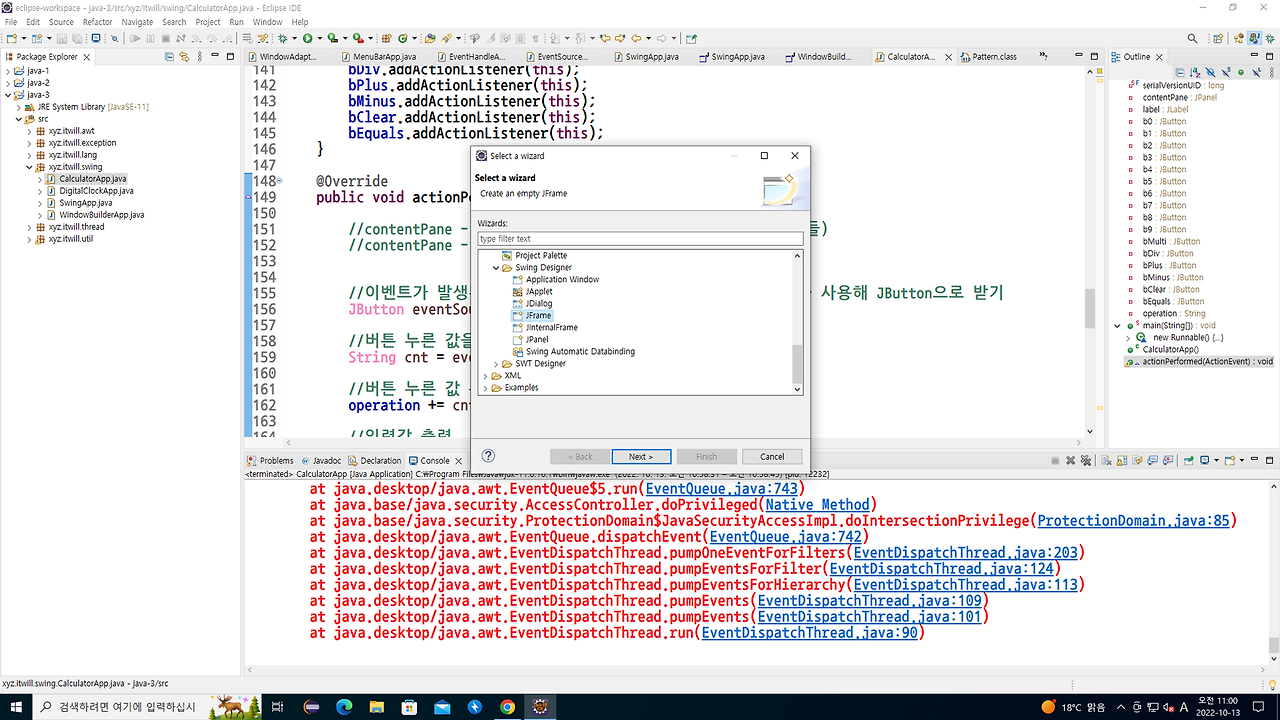

- Design 탭으로 이동해 사용하기

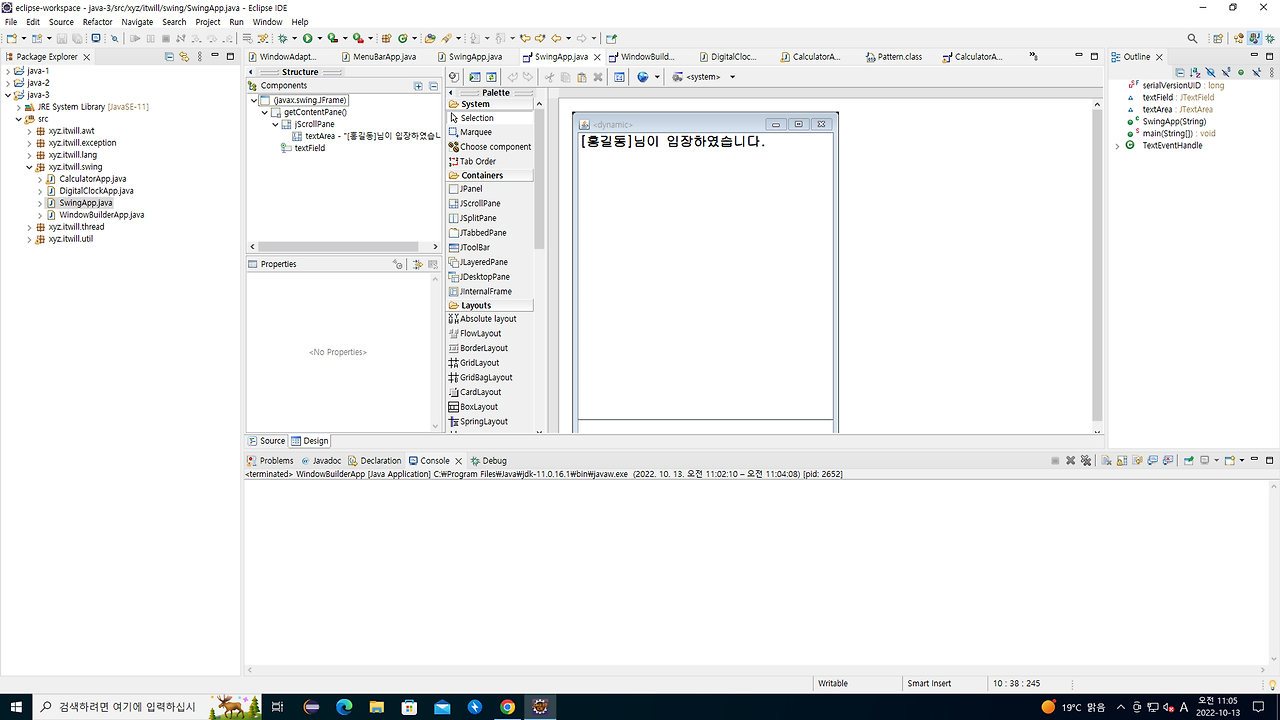
2. 🌈WindowBuilder를 사용해 디자인 꾸미고 확인하기
- 주의) JMenuBar는 코드 작성을 해줘야 함ㅠ
- setMenuBar( ) 을 써야하는데, add( )로 됨ㅠ
- J 꼭 붙이기!!!!
🌈WindowBuilderApp
- 지역변수는 이벤트 처리 메소드 사용 불가능하므로, 필드로 변경 해주기!

- 이벤트등록도 가능! 하지만 이벤트처리 코드는 코드내부에서 직접 작성해야함

🌈SwingApp
🌈 DigitalClockApp
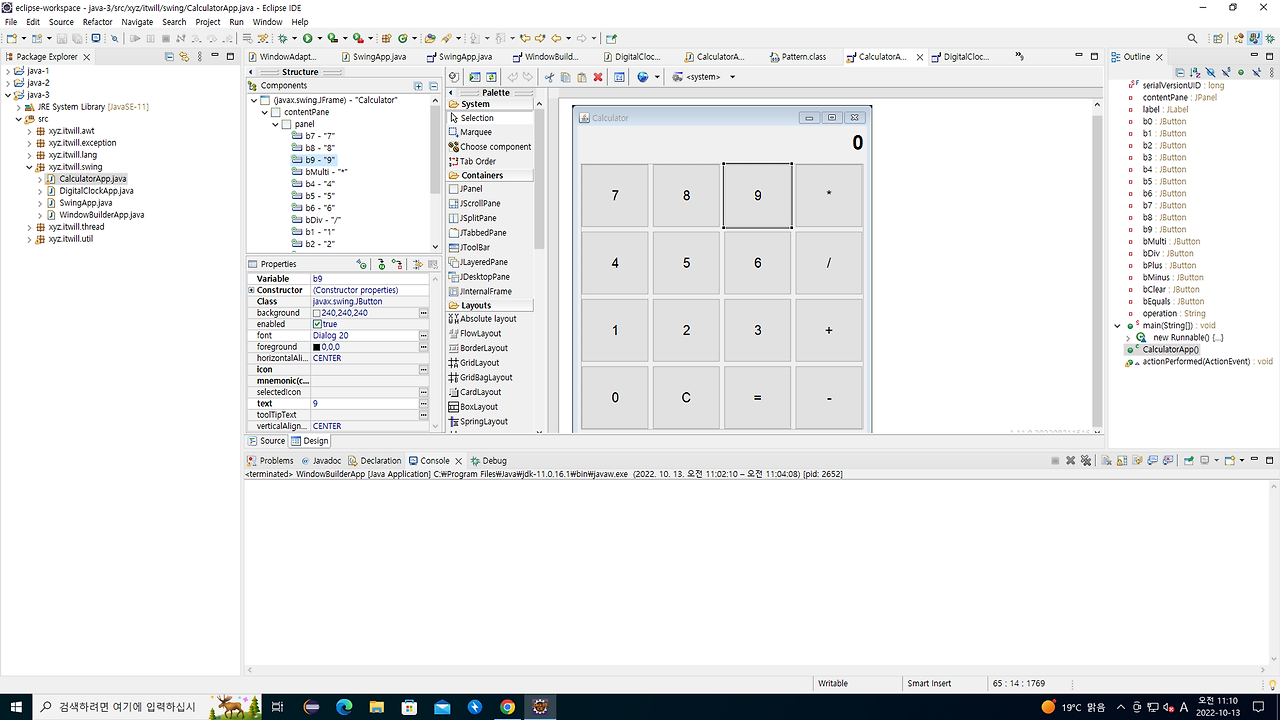
🌈 CalculatorApp

03. [⏰GUI프로그램] 디지털시계 프로그램
- swing패키지 + 다중스레드를 이용한
package xyz.itwill.swing;

import java.awt.BorderLayout;
import java.awt.Color;
import java.awt.Font;
import java.awt.event.ActionEvent;
import java.awt.event.ActionListener;
import java.text.SimpleDateFormat;
import java.util.Date;

import javax.swing.JButton;
import javax.swing.JFrame;
import javax.swing.JLabel;
import javax.swing.JPanel;

//메인 스레드 : UI 구현
//새로운 스레드 : 현재 날짜와 시간 1초마다 가져옴

//날짜와 시간을 출력하는 GUI 프로그램 작성
//🌈디자인클래스
public class DigitalClockApp extends JFrame {
	//필드
	private static final long serialVersionUID = 1L;

	//날짜와 시간을 출력하기 위한 컴포넌트를 저장할 필드
	private JLabel clockLabel;

	//스레드를 일시 중지하거나 다시 실행하기 위한 컴포넌트를 저장할 필드
	private JButton startBtn, stopBtn;

	//날짜와 시간을 변경하는 스레드의 실행상태를 저장할 필드
	// => false : 스레드 중지 상태
	//=>true : 스레드 동작 상태(기본)
	private boolean isRun;

	//생성자
	public DigitalClockApp(String title) {
		super(title);

		//1.
    	//🎩새로운 스레드를 위한..
		//(기본값)새로운 스레드는 동작중!이라는 상태를 알려줌
		isRun=true;

		//2.
		//JLabel컴포넌트 생성 + JLabel컴포넌트 꾸미기
		//clockLabel=new JLabel("2022년 10월 12일 17시 27분 40초",JLabel.CENTER); //새로운스레드가 현재시간을 계속 받아올테니 이제 무쓸모
		clockLabel=new JLabel("",JLabel.CENTER);
		clockLabel.setFont(new Font("굴림체", Font.BOLD, 30));
		clockLabel.setForeground(Color.DARK_GRAY);

		//3.
		//JButton컴포넌트 생성 + JButton컴포넌트 꾸미기
		startBtn=new JButton("다시 실행");
		stopBtn=new JButton("일시 중지");
		startBtn.setFont(new Font("굴림체", Font.BOLD, 20));
		stopBtn.setFont(new Font("굴림체", Font.BOLD, 20));

		//4.
    	//🐣우선! 버튼 비활성화 처리로 꾸미기
		startBtn.setEnabled(false);

		//5.
		//JPanel컨테이너 생성 후 버튼 부착
		JPanel jPanel=new JPanel();
		jPanel.add(startBtn);
		jPanel.add(stopBtn);

		//6.⭐
		//Frame객체의 레이아웃 변경 - JFrame
		getContentPane().add(clockLabel,BorderLayout.CENTER);
		getContentPane().add(jPanel,BorderLayout.SOUTH);

		//7.
    	//🎩새로운스레드를 위한..
		//새로운 스레드가 생성되어 run()메소드 명령 실행
		//=> 1초마다 시스템의 현재 날짜와 시간을 제공받아 컴포넌트 변경
		new ClockThread().start();

    	//8.
		//🐣이벤트발생 시 이벤트객체 생성
		startBtn.addActionListener(new ClockEventHandle());
		stopBtn.addActionListener(new ClockEventHandle());

    	//9.⭐
		// 프레임의 [닫기버튼]시 기능 변경
		setDefaultCloseOperation(EXIT_ON_CLOSE);

		//10.
		setBounds(700, 200, 600, 200);
		setVisible(true);
	}

	//main메소드
	public static void main(String[] args) {
		new DigitalClockApp("디지털 시계");
	}

	//시스템의 현재 날짜와 시간을 제공받아 컴포넌트를 변경하는 스레드 클래스
	//🎩스레드클래스
	public class ClockThread extends Thread{
		@Override
		public void run() {
			SimpleDateFormat dateFormat = new SimpleDateFormat("yyyy년 MM월 dd일 HH시 mm분 ss초");

			while(true) {
				if(isRun == true) { //스레드가 동작상태인 경우
					/*
					Date now = new Date();
					String clock = dateFormat.format(now);
					//JLabel.setText(String text) : JLabel의 컴포넌트의 문자열을 변경하는 메소드
					clockLabel.setText(clock);
					*/
					clockLabel.setText(dateFormat.format(new Date())); //참조변수 여러개 만들지 말고, 한문장으로!
				}
				try {
					Thread.sleep(1000);
				} catch (InterruptedException e) {
					// TODO Auto-generated catch block
					e.printStackTrace();
				}
			}

		}

	}

	//버튼을 누를 경우 실행될 이벤트 처리 클래스
  	//🍀이벤트처리클래스
	public class ClockEventHandle implements ActionListener{
		@Override
		public void actionPerformed(ActionEvent e) {
			 Object eventSource = e.getSource();

			 if (eventSource == startBtn) {
				 startBtn.setEnabled(false);
				 stopBtn.setEnabled(true);
				 isRun = true; //스레드를 실행상태로 변경 - 새로운 스레드가 명령 실행
			 } else if(eventSource == stopBtn) {
				 startBtn.setEnabled(true);
				 stopBtn.setEnabled(false);
				 isRun = false; //스레드를 중지상태로 변경 - 새로운 스레드가 명령 미실행
			 }

		}

	}
}
04. [🔲GUI프로그램] 계산기 프로그램
- swing패키지를 이용
- 이벤트 처리 명령을 어떻게 작성할 것인지에 대해 초점을 두고 보기!
package xyz.itwill.swing;

import java.awt.BorderLayout;

import java.awt.Color;
import java.awt.EventQueue;
import java.awt.Font;
import java.awt.GridLayout;
import java.awt.Panel;
import java.awt.event.ActionEvent;
import java.awt.event.ActionListener;
import java.util.regex.Pattern;

import javax.swing.JButton;
import javax.swing.JFrame;
import javax.swing.JLabel;
import javax.swing.JOptionPane;
import javax.swing.JPanel;
import javax.swing.SwingConstants;
import javax.swing.border.EmptyBorder;

public class CalculatorApp extends JFrame implements ActionListener {
	private static final long serialVersionUID = 1L;

	//🌈WindowBuilder에서 필드로 설정할지, 지역변수로 설정할지 변경 가능
	private JPanel contentPane;
	private JLabel label;
	private JButton b0, b1, b2, b3, b4, b5, b6, b7, b8, b9;
	private JButton bMulti, bDiv, bPlus, bMinus, bClear, bEquals;

	//⭐연산식을 저장하기 위한 필드
	private String operation="";

	//main메소드 : 🌈WindowBuilder를 통해 코드가 완성됨
	public static void main(String[] args) {
		EventQueue.invokeLater(new Runnable() {
			public void run() {
				try {
					CalculatorApp frame = new CalculatorApp();
					frame.setVisible(true);
				} catch (Exception e) {
					e.printStackTrace();
				}
			}
		});
	}

	public CalculatorApp() {

  		//🌈WindowBuilder에 없다면 직접 코드로 구현해주기
		setTitle("Calculator");
		setDefaultCloseOperation(JFrame.EXIT_ON_CLOSE);
		setBounds(600, 200, 450, 500);

    	//🌈WindowBuilder통해 디자인구현가능
    	/*
		contentPane = new JPanel();
		contentPane.setBorder(new EmptyBorder(5, 5, 5, 5));
		contentPane.setLayout(new BorderLayout(10, 10));
		setContentPane(contentPane);

		JPanel panel = new JPanel();
		contentPane.add(panel, BorderLayout.CENTER);
		panel.setLayout(new GridLayout(4, 4, 5, 5));

		b7 = new JButton("7");
		b7.setFont(new Font("Dialog", Font.PLAIN, 20));
		panel.add(b7);

		b8 = new JButton("8");
		b8.setFont(new Font("Dialog", Font.PLAIN, 20));
		panel.add(b8);

		b9 = new JButton("9");
		b9.setFont(new Font("Dialog", Font.PLAIN, 20));
		panel.add(b9);

		bMulti = new JButton("*");
		bMulti.setFont(new Font("Dialog", Font.PLAIN, 20));
		panel.add(bMulti);

		b4 = new JButton("4");
		b4.setFont(new Font("Dialog", Font.PLAIN, 20));
		panel.add(b4);

		b5 = new JButton("5");
		b5.setFont(new Font("Dialog", Font.PLAIN, 20));
		panel.add(b5);

		b6 = new JButton("6");
		b6.setFont(new Font("Dialog", Font.PLAIN, 20));
		panel.add(b6);

		bDiv = new JButton("/");
		bDiv.setFont(new Font("Dialog", Font.PLAIN, 20));
		panel.add(bDiv);

		b1 = new JButton("1");
		b1.setFont(new Font("Dialog", Font.PLAIN, 20));
		panel.add(b1);

		b2 = new JButton("2");
		b2.setFont(new Font("Dialog", Font.PLAIN, 20));
		panel.add(b2);

		b3 = new JButton("3");
		b3.setFont(new Font("Dialog", Font.PLAIN, 20));
		panel.add(b3);

		bPlus = new JButton("+");
		bPlus.setFont(new Font("Dialog", Font.PLAIN, 20));
		panel.add(bPlus);

		b0 = new JButton("0");
		b0.setFont(new Font("Dialog", Font.PLAIN, 20));
		panel.add(b0);

		bClear = new JButton("C");
		bClear.setFont(new Font("Dialog", Font.PLAIN, 20));
		panel.add(bClear);

		bEquals = new JButton("=");
		bEquals.setFont(new Font("Dialog", Font.PLAIN, 20));
		panel.add(bEquals);

		bMinus = new JButton("-");
		bMinus.setFont(new Font("Dialog", Font.PLAIN, 20));
		panel.add(bMinus);

		label = new JLabel("0");
		label.setBackground(Color.WHITE);
		label.setHorizontalAlignment(SwingConstants.TRAILING);
		label.setFont(new Font("Dialog", Font.BOLD, 30));
		contentPane.add(label, BorderLayout.NORTH);
    	*/

		//🐣WindowBuilder에서 이벤트 등록 가능 - 단, 이벤트 처리 명령은 직접 작성하기
    	/*
		b0.addActionListener(this);
		b1.addActionListener(this);
		b2.addActionListener(this);
		b3.addActionListener(this);
		b4.addActionListener(this);
		b5.addActionListener(this);
		b6.addActionListener(this);
		b7.addActionListener(this);
		b8.addActionListener(this);
		b9.addActionListener(this);

		bMulti.addActionListener(this);
		bDiv.addActionListener(this);
		bPlus.addActionListener(this);
		bMinus.addActionListener(this);
		bClear.addActionListener(this);
		bEquals.addActionListener(this);
    	*/
	}

	//🍀WindowBuilder에 의해 액션이벤트 등록이 되엇다면 안에 세부 이벤트 명령은 직접 작성해야한다.
	@Override
	public void actionPerformed(ActionEvent e) {

		//contentPane - JPanel >> panel - JPanel >> JButton (계산기 버튼)
		//					   >> label - JLabel(계산기 버튼이 출력되는 곳)
		//=> WindowBuilder통해 확인도  가능하다!

		//⭐중요 : 이벤트발생 객체를 얻어올 수 있어야 함⭐
		//이벤트가 발생된 컴포넌트(JButton 컴포넌트)를 반환받아 저장
		// => 반환받은 Object 객체를 JButton 클래스로 명시적 객체 형변환하여 저장
		JButton eventButton = (JButton)e.getSource();

		//⭐얻어온 이벤트의 처리명령은 크게 3가지로 나뉜다! - if제어문 이용⭐
		//이벤트가 발생된 JButton 컴포넌트를 구분하여 명령 처리

    	//📌
		if(eventButton == bClear) {//이벤트가 발생된 JButton 컴퍼넌트가 [Clear]인 경우
			operation=""; //연산식 저장 필드 초기화
			label.setText("0"); //출력컴포넌트 초기화

		//📌
		}else if(eventButton == bEquals) {//이벤트가 발생된 JButton 컴퍼넌트가 [Equals]인 경우
			//1.
			//연산식에서 검색하기 위한 연산자가 저장된 문자열 배열 선언
			String[] operatorArray={"*","/","+","-"};

			//2.
			//연산식에서 연산자 위치의 첨자를 저장하기 위한 변수
			int index = -1;

			//3.
			//연산식에서 연산자를 검색하기 위한 반복문
			for (int i = 0; i < operatorArray.length; i++) {
				index = operation.lastIndexOf(operatorArray[i]);
				if(index != -1) break;
			}

			//4.
			//연산식에서 연산자를 찾을 수 없는 경우 이벤트 처리 메소드 종료 - [=]버튼눌러도 계산이 안된다!
			if(index <= 0) return;

			//5. try-catch구문
			try {

				//5-1.
				//연산식에서 피연산자와 연산자를 분리하여 변수에 저장
				int num1 = Integer.parseInt(operation.substring(0, index));
				int num2 = Integer.parseInt(operation.substring(index+1));
				String operator = operation.substring(index, index+1);

				//5-2.
				//연산식를 비교하여 피연산자의 연산 결과를 저장
				int result = 0;
				switch (operator) {
				case "*": result = num1*num2; break;
				case "/": result = num1/num2; break;
				case "+": result = num1+num2; break;
				case "-": result = num1-num2; break;
				}

				//5-3.
				//JLabel 컴포넌트의 연산 결과 출력
				//=> 연산 결과값을 문자열로 반환해야 setText() 메소드 호출 가능
				//label.setText(String.valueOf(result));
				label.setText(result+"");

				//5-4.
				//operation="";//연산식 저장 필드 초기화
				operation=result+"";//연산 결과를 연산식에 저장 - 반복적인 연산 가능

			} catch (ArithmeticException exception) {//어떤 수를 0으로 나눈 경우 발생되는 예외

				operation="";
				label.setText("0으로 나눌 수 없습니다.");
			}
			catch(NumberFormatException exception) {//문자열을 숫자값으로 변환할 수 없는 경우 발생되는 예외

				operation="";
				label.setText("0");
				//JOptionPane.showMessageDialog(Component parent, String message)
				//=> 메세지를 출력하는 다이얼로그를 보여주는 메소드 : 부모 잘 모르겠음 null쓰기
				JOptionPane.showMessageDialog(this, "입력된 연산식이 형식에 맞지 않습니다.");

			}catch(Exception exception) { //모든 예외

				JOptionPane.showMessageDialog(this, "프로그램에 예기치 못한 오류가 있습니다.");
				System.exit(0);
			}

		//📌
		}else { //이벤트가 발생된 JButton 컴퍼넌트가 [Equals] && [Clear]가 아닌 경우

			//이벤트가 발생된 J컴포넌트의 문자열을 반환받아 연산식에 추가(결합)하여 저장
			//JComponent.getText() : 컴포넌트의 문자열을 반환하는 메소드
			operation += eventButton.getText();

			//연산식 label(JLabel컴포넌트)에 출력
			//JComponent.setText(String text) : 컴포넌트의 문자열을 변경하는 메소드
			label.setText(operation);
		}

	}
}
반응형
'java > java.awt & java.swing' 카테고리의 다른 글
| [java.awt] 3. 이벤트 프로그램 작성법 | Frame상속 | ActionListener상속 (0) | 2024.06.29 |
|---|---|
| [java.awt] 2. java.awt 패키지로 GUI 프로그램 만드는 법 (0) | 2024.06.29 |
| [java.awt & java.swing] 1. GUI프로그램의 개념 (0) | 2024.06.28 |
반응형
01. swing 프로그램 작성법
SwingApp.java
package xyz.itwill.swing;

import java.awt.BorderLayout;
import java.awt.Container;
import java.awt.Font;
import java.awt.event.ActionEvent;
import java.awt.event.ActionListener;

import javax.swing.JFrame;
import javax.swing.JScrollPane;
import javax.swing.JTextArea;
import javax.swing.JTextField;

//📦Swing 프로그램을 작성하는 방법

//📌Swing 프로그램을 작성하는 방법 - (java.awt와 다른점)
// => 🌈 1. java.awt 패키지의 컴퍼넌트 또는 컨테이너 관련 클래스 대신 javax.swing 패키지의 컴퍼넌트 또는 컨테이너 관련 클래스를 사용하여 UI 구현
// => AWT 컴퍼넌트 또는 컨테이너 클래스 이름 앞의 J를 붙이면 Swing 컴퍼넌트 또는 컨테이너 클래스가 된다.
// => javax.swing패키지는 많은 컴포넌트와 컨테이너 존재
// =>  더 다양한 모양의 UI 구현 가능

// => 🐣 2. 프레임의 [닫기버튼]를 누른 경우 동작되는 기능을 변경하여 프레임 조작 가능
// => 간편닫기기능
//형식) JFrame.setDefaultCloseOperation(int operation);
// => operation 매개변수에는 DO_NOTHING_ON_CLOSE, HIDE_ON_CLOSE(기본), DISPOSE_ON_CLOSE, EXIT_ON_CLOSE 중 하나의 상수를 사용하여 프레임의 조작 방법 설정

// => 3.프레임을 직접 변경하지 않고 프레임의 Container 객체를 반환받아 변경 처리
// => Container container = getContentPane();
// => 프레임의 배치관리자 변경, 프레임의 컴퍼넌트 부착, 프레임의 배경색 변경 등

// => 📌그 외 나머지는 java.awt패키지와 동일하다.

//🌈디자인클래스
public class SwingApp extends JFrame{

	//필드
	private static final long serialVersionUID = 1L;

	// => JTextField 컴포넌트에서 문자열 입력 후 엔터를 치면 ActionEvent 발생
	JTextField textField; //TextField클래스 대신 JTextField클래스
	JTextArea textArea;  //TextArea클래스 대신 JTextArea클래스

  	//생성자
	public SwingApp(String title) {
		super(title);

		//1.
    	//JTextField와 JTextArea생성
		textField = new JTextField();
		textArea = new JTextArea("[홍길동]님이 입장하였습니다.\\\\n");

    	//2.⭐
    	//스크롤 생성을 위한 컨테이너 생성 -> awt패키지는 자동스크롤이라 생성필요없었는데ㅠ
		// => JScrollPane : 컴포넌트가 범위를 벗어날 경우 스크롤을 생성하기 위한 컨테이너
		JScrollPane jScrollPane = new JScrollPane(textArea);

    	//3-1.⭐
    	//Frame객체를 변경하기 위해 프레임의 Container 객체 반환받음
		// => JFrame.getContentPane() : 프레임의 컨테이너 기능을 제공하는 Container 객체를 반환하는 메소드
		Container container = getContentPane();

		//3-2.⭐
    	//프레임의 레이아웃설정
		container.add(jScrollPane, BorderLayout.CENTER);
		container.add(textField, BorderLayout.SOUTH);

    	//4.
    	//JTextField와 JTextArea 꾸미기 - Swing 프로그램에서는 모든 글꼴 사용 가능
		textField.setFont(new Font("굴림체", Font.BOLD, 20));
		textArea.setFont(new Font("굴림체", Font.BOLD, 20));
		textArea.setFocusable(false); //출력컴포넌트
		//textArea.setFocusable(true); //입력컴포넌트

    	//5.⭐
		// 프레임의 [닫기버튼]시 기능 변경
		setDefaultCloseOperation(EXIT_ON_CLOSE);

    	//6.
    	//🐣이벤트발생 시 이벤트객체 생성!!!!!
    	//=>해석) textField에서 Action이벤트가 발생하면 TextEventHandle객체가 처리해줄거에요
		textField.addActionListener(new TextEventHandle());

		//7.
		setBounds(800,200,400,500);
		setVisible(true);
	}

	//main메소드
	public static void main(String[] args) {
		new SwingApp("Swing");
	}

	//🍀이벤트처리클래스
	public class TextEventHandle implements ActionListener{
		@Override
		public void actionPerformed(ActionEvent e) {
			//TextComponent.getText() :  JTextField 컴퍼넌트 또는 JTextArea 컴퍼넌트에 입력된 문자열을 얻어와 반환하는 메소드
			String text = textField.getText();

			if(!text.equals("")) { //입력된 문자열이 있는 경우(만약 text가 nullString이 아니라면)
				//JTextArea.append(String text) : JTextArea 컴퍼넌트에 문자열을 추가하여 출력하는 메소드
				textArea.append("[홍길동]" + text + "\\\\n");

				//TextComponent.setText(String text) : JTextField 컴퍼넌트 또는 JTextArea 컴퍼넌트에 입력된 문자열을 변경하는 메소드
				textField.setText(""); //초기화처리 (textField에 아무것도 없게 해주세요)
			}
		}

	}

}
02. windowbuilder 사용 (자바 Plug-In)
1. 📦 windowbuilder 설치법하기
📦Plug-In이란?
- 확장프로그램
📦windowbuilder 확장프로그램(플러그인)이란?
- javax.swing패키지 프로그램을 만들어낼 수 있는 디자인 도구
- javax.swing패키지로 개발할 때 좀 더 쉽게 개발을 도와줌
📦Plug-In 설치방법 (with 이클립스)
- 이클립스 사이트 내
- projects클릭 >> windowbuilder검색 >> url복사 >> 이클립스의 help버튼클릭 >> install new software >> work with에 url 주소 복사 후 엔터 >> 설치할 수 있는 프로그램 목록들 나옴, window builder 선택 >> 다 선택해도 되고, 동의 후 설치 >> 재실행

- 이클립스 프로그램 내
- 이클립스의 help버튼클릭 >> marketpalce클릭 >> 검색 >> 설치
📦Plug-In 사용방법 (with 이클립스)
- 마우스왼쪽클릭 >> openwith >> widow builder editor


- Design 탭으로 이동해 사용하기

2. 🌈WindowBuilder를 사용해 디자인 꾸미고 확인하기
- 주의) JMenuBar는 코드 작성을 해줘야 함ㅠ
- setMenuBar( ) 을 써야하는데, add( )로 됨ㅠ
- J 꼭 붙이기!!!!
🌈WindowBuilderApp
- 지역변수는 이벤트 처리 메소드 사용 불가능하므로, 필드로 변경 해주기!

- 이벤트등록도 가능! 하지만 이벤트처리 코드는 코드내부에서 직접 작성해야함

🌈SwingApp

🌈 DigitalClockApp
🌈 CalculatorApp


03. [⏰GUI프로그램] 디지털시계 프로그램
- swing패키지 + 다중스레드를 이용한
package xyz.itwill.swing;

import java.awt.BorderLayout;
import java.awt.Color;
import java.awt.Font;
import java.awt.event.ActionEvent;
import java.awt.event.ActionListener;
import java.text.SimpleDateFormat;
import java.util.Date;

import javax.swing.JButton;
import javax.swing.JFrame;
import javax.swing.JLabel;
import javax.swing.JPanel;

//메인 스레드 : UI 구현
//새로운 스레드 : 현재 날짜와 시간 1초마다 가져옴

//날짜와 시간을 출력하는 GUI 프로그램 작성
//🌈디자인클래스
public class DigitalClockApp extends JFrame {
	//필드
	private static final long serialVersionUID = 1L;

	//날짜와 시간을 출력하기 위한 컴포넌트를 저장할 필드
	private JLabel clockLabel;

	//스레드를 일시 중지하거나 다시 실행하기 위한 컴포넌트를 저장할 필드
	private JButton startBtn, stopBtn;

	//날짜와 시간을 변경하는 스레드의 실행상태를 저장할 필드
	// => false : 스레드 중지 상태
	//=>true : 스레드 동작 상태(기본)
	private boolean isRun;

	//생성자
	public DigitalClockApp(String title) {
		super(title);

		//1.
    	//🎩새로운 스레드를 위한..
		//(기본값)새로운 스레드는 동작중!이라는 상태를 알려줌
		isRun=true;

		//2.
		//JLabel컴포넌트 생성 + JLabel컴포넌트 꾸미기
		//clockLabel=new JLabel("2022년 10월 12일 17시 27분 40초",JLabel.CENTER); //새로운스레드가 현재시간을 계속 받아올테니 이제 무쓸모
		clockLabel=new JLabel("",JLabel.CENTER);
		clockLabel.setFont(new Font("굴림체", Font.BOLD, 30));
		clockLabel.setForeground(Color.DARK_GRAY);

		//3.
		//JButton컴포넌트 생성 + JButton컴포넌트 꾸미기
		startBtn=new JButton("다시 실행");
		stopBtn=new JButton("일시 중지");
		startBtn.setFont(new Font("굴림체", Font.BOLD, 20));
		stopBtn.setFont(new Font("굴림체", Font.BOLD, 20));

		//4.
    	//🐣우선! 버튼 비활성화 처리로 꾸미기
		startBtn.setEnabled(false);

		//5.
		//JPanel컨테이너 생성 후 버튼 부착
		JPanel jPanel=new JPanel();
		jPanel.add(startBtn);
		jPanel.add(stopBtn);

		//6.⭐
		//Frame객체의 레이아웃 변경 - JFrame
		getContentPane().add(clockLabel,BorderLayout.CENTER);
		getContentPane().add(jPanel,BorderLayout.SOUTH);

		//7.
    	//🎩새로운스레드를 위한..
		//새로운 스레드가 생성되어 run()메소드 명령 실행
		//=> 1초마다 시스템의 현재 날짜와 시간을 제공받아 컴포넌트 변경
		new ClockThread().start();

    	//8.
		//🐣이벤트발생 시 이벤트객체 생성
		startBtn.addActionListener(new ClockEventHandle());
		stopBtn.addActionListener(new ClockEventHandle());

    	//9.⭐
		// 프레임의 [닫기버튼]시 기능 변경
		setDefaultCloseOperation(EXIT_ON_CLOSE);

		//10.
		setBounds(700, 200, 600, 200);
		setVisible(true);
	}

	//main메소드
	public static void main(String[] args) {
		new DigitalClockApp("디지털 시계");
	}

	//시스템의 현재 날짜와 시간을 제공받아 컴포넌트를 변경하는 스레드 클래스
	//🎩스레드클래스
	public class ClockThread extends Thread{
		@Override
		public void run() {
			SimpleDateFormat dateFormat = new SimpleDateFormat("yyyy년 MM월 dd일 HH시 mm분 ss초");

			while(true) {
				if(isRun == true) { //스레드가 동작상태인 경우
					/*
					Date now = new Date();
					String clock = dateFormat.format(now);
					//JLabel.setText(String text) : JLabel의 컴포넌트의 문자열을 변경하는 메소드
					clockLabel.setText(clock);
					*/
					clockLabel.setText(dateFormat.format(new Date())); //참조변수 여러개 만들지 말고, 한문장으로!
				}
				try {
					Thread.sleep(1000);
				} catch (InterruptedException e) {
					// TODO Auto-generated catch block
					e.printStackTrace();
				}
			}

		}

	}

	//버튼을 누를 경우 실행될 이벤트 처리 클래스
  	//🍀이벤트처리클래스
	public class ClockEventHandle implements ActionListener{
		@Override
		public void actionPerformed(ActionEvent e) {
			 Object eventSource = e.getSource();

			 if (eventSource == startBtn) {
				 startBtn.setEnabled(false);
				 stopBtn.setEnabled(true);
				 isRun = true; //스레드를 실행상태로 변경 - 새로운 스레드가 명령 실행
			 } else if(eventSource == stopBtn) {
				 startBtn.setEnabled(true);
				 stopBtn.setEnabled(false);
				 isRun = false; //스레드를 중지상태로 변경 - 새로운 스레드가 명령 미실행
			 }

		}

	}
}
04. [🔲GUI프로그램] 계산기 프로그램
- swing패키지를 이용
- 이벤트 처리 명령을 어떻게 작성할 것인지에 대해 초점을 두고 보기!
package xyz.itwill.swing;

import java.awt.BorderLayout;

import java.awt.Color;
import java.awt.EventQueue;
import java.awt.Font;
import java.awt.GridLayout;
import java.awt.Panel;
import java.awt.event.ActionEvent;
import java.awt.event.ActionListener;
import java.util.regex.Pattern;

import javax.swing.JButton;
import javax.swing.JFrame;
import javax.swing.JLabel;
import javax.swing.JOptionPane;
import javax.swing.JPanel;
import javax.swing.SwingConstants;
import javax.swing.border.EmptyBorder;

public class CalculatorApp extends JFrame implements ActionListener {
	private static final long serialVersionUID = 1L;

	//🌈WindowBuilder에서 필드로 설정할지, 지역변수로 설정할지 변경 가능
	private JPanel contentPane;
	private JLabel label;
	private JButton b0, b1, b2, b3, b4, b5, b6, b7, b8, b9;
	private JButton bMulti, bDiv, bPlus, bMinus, bClear, bEquals;

	//⭐연산식을 저장하기 위한 필드
	private String operation="";

	//main메소드 : 🌈WindowBuilder를 통해 코드가 완성됨
	public static void main(String[] args) {
		EventQueue.invokeLater(new Runnable() {
			public void run() {
				try {
					CalculatorApp frame = new CalculatorApp();
					frame.setVisible(true);
				} catch (Exception e) {
					e.printStackTrace();
				}
			}
		});
	}

	public CalculatorApp() {

  		//🌈WindowBuilder에 없다면 직접 코드로 구현해주기
		setTitle("Calculator");
		setDefaultCloseOperation(JFrame.EXIT_ON_CLOSE);
		setBounds(600, 200, 450, 500);

    	//🌈WindowBuilder통해 디자인구현가능
    	/*
		contentPane = new JPanel();
		contentPane.setBorder(new EmptyBorder(5, 5, 5, 5));
		contentPane.setLayout(new BorderLayout(10, 10));
		setContentPane(contentPane);

		JPanel panel = new JPanel();
		contentPane.add(panel, BorderLayout.CENTER);
		panel.setLayout(new GridLayout(4, 4, 5, 5));

		b7 = new JButton("7");
		b7.setFont(new Font("Dialog", Font.PLAIN, 20));
		panel.add(b7);

		b8 = new JButton("8");
		b8.setFont(new Font("Dialog", Font.PLAIN, 20));
		panel.add(b8);

		b9 = new JButton("9");
		b9.setFont(new Font("Dialog", Font.PLAIN, 20));
		panel.add(b9);

		bMulti = new JButton("*");
		bMulti.setFont(new Font("Dialog", Font.PLAIN, 20));
		panel.add(bMulti);

		b4 = new JButton("4");
		b4.setFont(new Font("Dialog", Font.PLAIN, 20));
		panel.add(b4);

		b5 = new JButton("5");
		b5.setFont(new Font("Dialog", Font.PLAIN, 20));
		panel.add(b5);

		b6 = new JButton("6");
		b6.setFont(new Font("Dialog", Font.PLAIN, 20));
		panel.add(b6);

		bDiv = new JButton("/");
		bDiv.setFont(new Font("Dialog", Font.PLAIN, 20));
		panel.add(bDiv);

		b1 = new JButton("1");
		b1.setFont(new Font("Dialog", Font.PLAIN, 20));
		panel.add(b1);

		b2 = new JButton("2");
		b2.setFont(new Font("Dialog", Font.PLAIN, 20));
		panel.add(b2);

		b3 = new JButton("3");
		b3.setFont(new Font("Dialog", Font.PLAIN, 20));
		panel.add(b3);

		bPlus = new JButton("+");
		bPlus.setFont(new Font("Dialog", Font.PLAIN, 20));
		panel.add(bPlus);

		b0 = new JButton("0");
		b0.setFont(new Font("Dialog", Font.PLAIN, 20));
		panel.add(b0);

		bClear = new JButton("C");
		bClear.setFont(new Font("Dialog", Font.PLAIN, 20));
		panel.add(bClear);

		bEquals = new JButton("=");
		bEquals.setFont(new Font("Dialog", Font.PLAIN, 20));
		panel.add(bEquals);

		bMinus = new JButton("-");
		bMinus.setFont(new Font("Dialog", Font.PLAIN, 20));
		panel.add(bMinus);

		label = new JLabel("0");
		label.setBackground(Color.WHITE);
		label.setHorizontalAlignment(SwingConstants.TRAILING);
		label.setFont(new Font("Dialog", Font.BOLD, 30));
		contentPane.add(label, BorderLayout.NORTH);
    	*/

		//🐣WindowBuilder에서 이벤트 등록 가능 - 단, 이벤트 처리 명령은 직접 작성하기
    	/*
		b0.addActionListener(this);
		b1.addActionListener(this);
		b2.addActionListener(this);
		b3.addActionListener(this);
		b4.addActionListener(this);
		b5.addActionListener(this);
		b6.addActionListener(this);
		b7.addActionListener(this);
		b8.addActionListener(this);
		b9.addActionListener(this);

		bMulti.addActionListener(this);
		bDiv.addActionListener(this);
		bPlus.addActionListener(this);
		bMinus.addActionListener(this);
		bClear.addActionListener(this);
		bEquals.addActionListener(this);
    	*/
	}

	//🍀WindowBuilder에 의해 액션이벤트 등록이 되엇다면 안에 세부 이벤트 명령은 직접 작성해야한다.
	@Override
	public void actionPerformed(ActionEvent e) {

		//contentPane - JPanel >> panel - JPanel >> JButton (계산기 버튼)
		//					   >> label - JLabel(계산기 버튼이 출력되는 곳)
		//=> WindowBuilder통해 확인도  가능하다!

		//⭐중요 : 이벤트발생 객체를 얻어올 수 있어야 함⭐
		//이벤트가 발생된 컴포넌트(JButton 컴포넌트)를 반환받아 저장
		// => 반환받은 Object 객체를 JButton 클래스로 명시적 객체 형변환하여 저장
		JButton eventButton = (JButton)e.getSource();

		//⭐얻어온 이벤트의 처리명령은 크게 3가지로 나뉜다! - if제어문 이용⭐
		//이벤트가 발생된 JButton 컴포넌트를 구분하여 명령 처리

    	//📌
		if(eventButton == bClear) {//이벤트가 발생된 JButton 컴퍼넌트가 [Clear]인 경우
			operation=""; //연산식 저장 필드 초기화
			label.setText("0"); //출력컴포넌트 초기화

		//📌
		}else if(eventButton == bEquals) {//이벤트가 발생된 JButton 컴퍼넌트가 [Equals]인 경우
			//1.
			//연산식에서 검색하기 위한 연산자가 저장된 문자열 배열 선언
			String[] operatorArray={"*","/","+","-"};

			//2.
			//연산식에서 연산자 위치의 첨자를 저장하기 위한 변수
			int index = -1;

			//3.
			//연산식에서 연산자를 검색하기 위한 반복문
			for (int i = 0; i < operatorArray.length; i++) {
				index = operation.lastIndexOf(operatorArray[i]);
				if(index != -1) break;
			}

			//4.
			//연산식에서 연산자를 찾을 수 없는 경우 이벤트 처리 메소드 종료 - [=]버튼눌러도 계산이 안된다!
			if(index <= 0) return;

			//5. try-catch구문
			try {

				//5-1.
				//연산식에서 피연산자와 연산자를 분리하여 변수에 저장
				int num1 = Integer.parseInt(operation.substring(0, index));
				int num2 = Integer.parseInt(operation.substring(index+1));
				String operator = operation.substring(index, index+1);

				//5-2.
				//연산식를 비교하여 피연산자의 연산 결과를 저장
				int result = 0;
				switch (operator) {
				case "*": result = num1*num2; break;
				case "/": result = num1/num2; break;
				case "+": result = num1+num2; break;
				case "-": result = num1-num2; break;
				}

				//5-3.
				//JLabel 컴포넌트의 연산 결과 출력
				//=> 연산 결과값을 문자열로 반환해야 setText() 메소드 호출 가능
				//label.setText(String.valueOf(result));
				label.setText(result+"");

				//5-4.
				//operation="";//연산식 저장 필드 초기화
				operation=result+"";//연산 결과를 연산식에 저장 - 반복적인 연산 가능

			} catch (ArithmeticException exception) {//어떤 수를 0으로 나눈 경우 발생되는 예외

				operation="";
				label.setText("0으로 나눌 수 없습니다.");
			}
			catch(NumberFormatException exception) {//문자열을 숫자값으로 변환할 수 없는 경우 발생되는 예외

				operation="";
				label.setText("0");
				//JOptionPane.showMessageDialog(Component parent, String message)
				//=> 메세지를 출력하는 다이얼로그를 보여주는 메소드 : 부모 잘 모르겠음 null쓰기
				JOptionPane.showMessageDialog(this, "입력된 연산식이 형식에 맞지 않습니다.");

			}catch(Exception exception) { //모든 예외

				JOptionPane.showMessageDialog(this, "프로그램에 예기치 못한 오류가 있습니다.");
				System.exit(0);
			}

		//📌
		}else { //이벤트가 발생된 JButton 컴퍼넌트가 [Equals] && [Clear]가 아닌 경우

			//이벤트가 발생된 J컴포넌트의 문자열을 반환받아 연산식에 추가(결합)하여 저장
			//JComponent.getText() : 컴포넌트의 문자열을 반환하는 메소드
			operation += eventButton.getText();

			//연산식 label(JLabel컴포넌트)에 출력
			//JComponent.setText(String text) : 컴포넌트의 문자열을 변경하는 메소드
			label.setText(operation);
		}

	}
}
반응형
'java > java.awt & java.swing' 카테고리의 다른 글
| [java.awt] 3. 이벤트 프로그램 작성법 | Frame상속 | ActionListener상속 (0) | 2024.06.29 |
|---|---|
| [java.awt] 2. java.awt 패키지로 GUI 프로그램 만드는 법 (0) | 2024.06.29 |
| [java.awt & java.swing] 1. GUI프로그램의 개념 (0) | 2024.06.28 |

